---
title: How to set up GateLIFT (administrator guide)
description: Step-by-step guide for administrators to set up GateLIFT in Ronspot — claim your barrier controller, add barriers, map them to parking zones, and add operators
---
[Skip to content](https://help.ronspot.co/gatelift-administrator-guide#main-content)
[Open support ticket](https://help.ronspot.co/kb-tickets/new?hsLang=en) [Track my tickets](https://ronspot.co/customer-portal?hsLang=en)
[](https://ronspotflexwork.com/)
- [Platform](https://ronspotflexwork.com/platform/)
Show submenu for Platform
- [Parking Management System](https://ronspotflexwork.com/office-parking-management/)
- [Desk Booking System](https://ronspotflexwork.com/desk-booking-system/)
- [Meeting Room Booking System](https://ronspotflexwork.com/meeting-room-booking-system/)
- [Workplace Analytics](https://ronspotflexwork.com/workplace-analytics/)
- [Integrations](https://ronspotflexwork.com/integrations/)
- Solutions
Show submenu for Solutions
- [Employee Experience](https://ronspotflexwork.com/employee-experience/)
- [Workplace Operations](https://ronspotflexwork.com/workplace-operations/)
- [Space Planning](https://ronspotflexwork.com/space-management/)
- [Customer Case Studies](https://ronspotflexwork.com/case-studies/)
- [Pricing](https://ronspotflexwork.com/pricing/)
- Resources
Show submenu for Resources
- [Help Centre](https://help.ronspot.co/)
- [Product Updates](https://ronspotflexwork.com/feature-releases/)
- [System Status](https://ronspotflexwork.com/system-status/)
- [Contact](https://ronspotflexwork.com/contact-us/)
Open main navigation
Close main navigation
- [Platform](https://ronspotflexwork.com/platform/)
Show submenu for Platform
- [Parking Management System](https://ronspotflexwork.com/office-parking-management/)
- [Desk Booking System](https://ronspotflexwork.com/desk-booking-system/)
- [Meeting Room Booking System](https://ronspotflexwork.com/meeting-room-booking-system/)
- [Workplace Analytics](https://ronspotflexwork.com/workplace-analytics/)
- [Integrations](https://ronspotflexwork.com/integrations/)
- Solutions
Show submenu for Solutions
- [Employee Experience](https://ronspotflexwork.com/employee-experience/)
- [Workplace Operations](https://ronspotflexwork.com/workplace-operations/)
- [Space Planning](https://ronspotflexwork.com/space-management/)
- [Customer Case Studies](https://ronspotflexwork.com/case-studies/)
- [Pricing](https://ronspotflexwork.com/pricing/)
- Resources
Show submenu for Resources
- [Help Centre](https://help.ronspot.co/)
- [Product Updates](https://ronspotflexwork.com/feature-releases/)
- [System Status](https://ronspotflexwork.com/system-status/)
- [Contact](https://ronspotflexwork.com/contact-us/)
- [Open support ticket](https://help.ronspot.co/kb-tickets/new)
- [Track my tickets](https://ronspot.co/customer-portal)
- [Book a Demo](https://ronspotflexwork.com/book-a-demo/)
[Book a Demo](https://ronspotflexwork.com/book-a-demo/)
Need help with Ronspot?
- There are no suggestions because the search field is empty.
1. [Help Centre](https://help.ronspot.co/?hsLang=en)
2. [Integrations](https://help.ronspot.co/integrations?hsLang=en)
3. [Access Control Systems](https://help.ronspot.co/integrations?hsLang=en#access-control-systems)
July 30, 2026
# How to set up GateLIFT (administrator guide)
## Step-by-step for administrators: claim your barrier controller, add barriers, map them to parking zones, and grant operators all from the Ronspot admin.
---
### Contents
1. [What you'll set up](https://help.ronspot.co/gatelift-administrator-guide#what-youll-set-up)
2. [Before you begin](https://help.ronspot.co/gatelift-administrator-guide#before-you-begin)
3. [How to configure GateLIFT](https://help.ronspot.co/gatelift-administrator-guide#how-to-configure-gatelift)
4. [Optional per-barrier settings](https://help.ronspot.co/gatelift-administrator-guide#optional-per-barrier-settings)
5. [Check it works, end to end](https://help.ronspot.co/gatelift-administrator-guide#check-it-works)
6. [Troubleshooting](https://help.ronspot.co/gatelift-administrator-guide#troubleshooting)
7. [What your employees see](https://help.ronspot.co/gatelift-administrator-guide#what-your-employees-see)
### 1. What you'll set up
GateLIFT lets your employees open a car-park barrier straight from the Ronspot app when they have a parking booking. Before that works, an administrator links the hardware to your Ronspot account and tells Ronspot which barriers serve which parking zones. This guide covers the four steps:
1. **Add the controller** (the hardware)
2. **Add barriers** (each output on the controller)
3. **Connect barriers to parking zones**
4. **(Optional) Add operators** who can open without a booking
Everything is in one place: **Account → Integrations → Add integration → GateLIFT**.
The controller hardware is pre-provisioned by Ronspot and you simply claim it with a pairing code.
### 2. Before you begin
1. The GateLIFT **hardware is installed and wired** to your barrier (by an electrician, see the wiring guide).
2. You have the controller's **pairing code** (supplied by Ronspot. Label on the unit's).
3. Your **parking zones** are already set up in Ronspot.
4. You're signed in as a **Ronspot administrator**.
### 3. How to configure GateLIFT
#### Step 1: Add a controller
A controller is the physical device wired to your barrier. Each controller has up to two outputs (so it can drive up to two barriers or hold open a barrier).
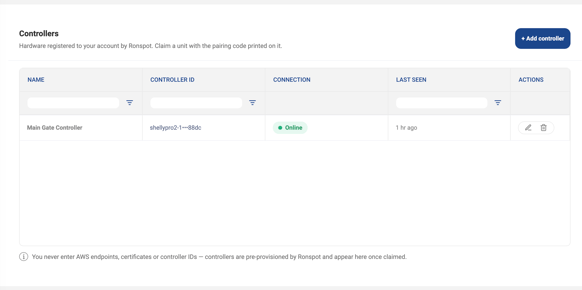
1. Go to **Account → Integrations → Add integration→ GateLIFT**.
2. In the **Controllers** section, click **+ Add controller**.
3. Enter the **pairing code** and a friendly **Name** (e.g. *"Main gate controller"*).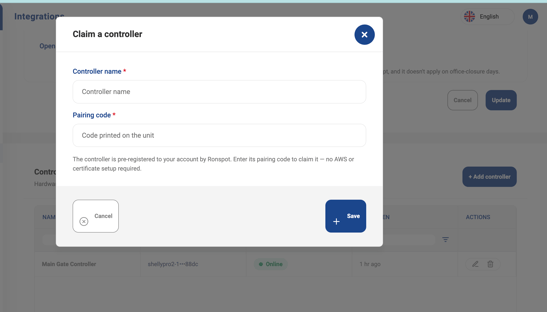
4. Click **Save**. The controller appears in the list showing its **Connection** (Online / Offline) and **Last seen**.
**TIP:** If the controller shows **Offline**, check it's powered and has signal — it connects over the mobile network via its modem. See *Troubleshooting* below.
---
#### Step 2: Add a barrier
A barrier is one output on a controller. A controller has two outputs, so it can run up to two barriers (e.g. an entry lane and an exit lane).
1. In the **Barriers** section, click **+ Add barrier**.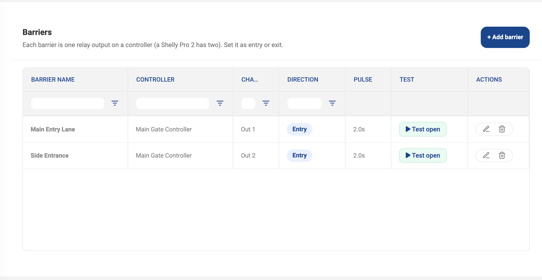
2. Fill in:
1. **Barrier name** — e.g. *"North entry lane"*.
2. **Controller** — pick the one you added in Step 1.
3. **Output** — **Out 1** or **Out 2** (must match how it was wired).
4. **Mode** — **Open (momentary)** for a normal open; **Hold-open (maintenance)** only if the barrier is wired for a held-open input.
5. **Direction** — **Entry** or **Exit**.
6. **Pulse (seconds)** — how long the open signal lasts (default **2.0s**).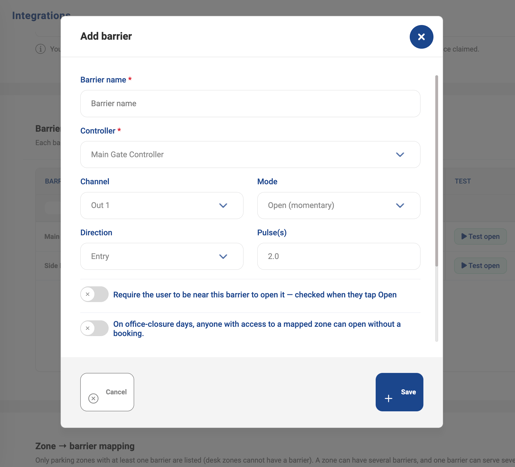
3. Click **Save**.
4. Click **Test open** next to the barrier — the barrier should fire and move.
**IMPORTANT.** Do the Test open on site with the installer, so you can confirm the correct Output and wiring *before* going live.
Repeat Step 2 for each barrier (e.g. add the exit lane on Out 2). *Optional per-barrier settings — open-access hours and geofence — are covered at the end.*
---
#### Step 3: Connect barriers to parking zones
This tells Ronspot **which barriers serve which parking zone** — so an employee with a booking in that zone can open the right barrier.
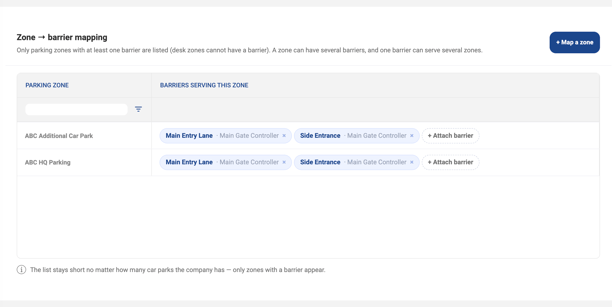
1. In the **Zone → barrier mapping** section, click **+ Map a zone**.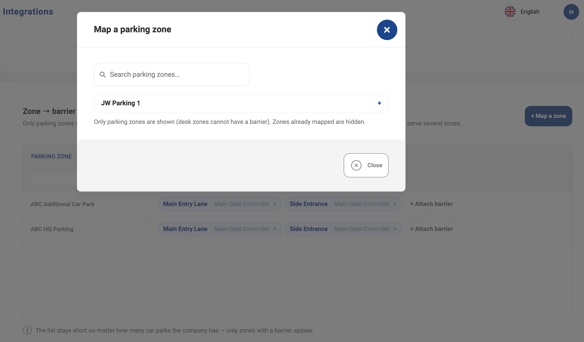
2. Choose a **parking zone**. *(Only parking zones appear — desk zones can't have a barrier.)*
3. **Attach** one or more barriers to that zone.
4. Repeat for every zone that has a barrier.
**Good to know.** A zone can have several barriers (e.g. entry + exit), and one barrier can serve several zones (e.g. one gate into a car park split into zones). Only zones that already have a barrier show in the list — use + Map a zone to add more.
---
#### Step 4 (optional): Add operators
By default, an employee can open a barrier only on a day they have a booking. Operators can open *without* a booking — useful for security, facilities, reception, or letting in deliveries.
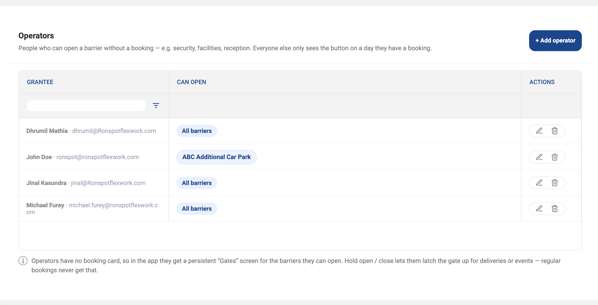
1. In the **Operators** section, click **+ Add operator**.
2. Choose **Grant to**:
- **Individual** — pick a specific employee, *or*
- **Emergency role** — pick an existing role (e.g. *"Security"*). Everyone in that role gets access, and new members inherit it automatically.
3. Choose the **scope** — **All barriers**, or **specific zones** only.
4. *(Optional)* **Allow hold open / close** — lets the operator prop the gate open and release it (for events/deliveries). Regular bookings never get this.
5. Click **Save**.
### 4. Optional per-barrier settings
Below the main fields on the Add / Edit barrier form there are **two optional toggles**. Both are off by default and set **per barrier**, so you can use different rules on different barriers.
#### 4.1 Require the user to be near this barrier to open it (geofence)
Turn this on if the app's Open button should only work when the employee is physically at the barrier. A deterrent against someone opening the gate remotely (for example from home) to let others in. When you switch it on, these settings appear:
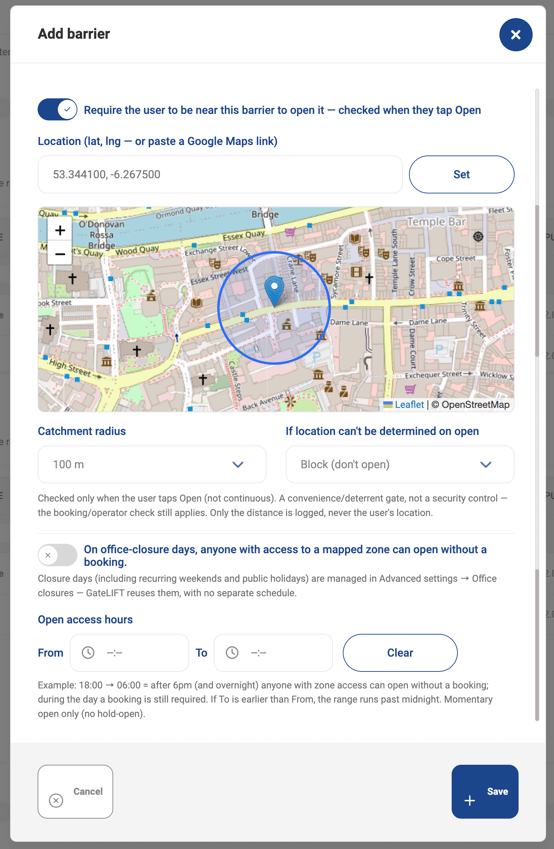
- **Location** — where the barrier is. Type it as `latitude, longitude`, **or paste a Google Maps link**, then click **Set**. A map appears with a pin and a circle showing the catchment area — you can drag the pin to fine-tune the exact spot.
- **Catchment radius** — how close the user has to be, from **20 m up to 1 km**. Choose a larger radius for barriers hemmed in by tall buildings or below ground, where phone GPS is less accurate — too tight a radius can stop someone opening even when they're standing right at it.
- **If location can't be determined on open** — what happens when the phone can't get a location (GPS off, no signal, or the user denied permission):
- **Block (don't open)** — best for **entry** barriers, so someone can't simply turn off location to open from home.
- **Allow (open anyway)** — best for **exit** barriers, so no one ever gets trapped inside unable to leave.
**Good to know:** The location is checked only when the user taps Open — the app does not track anyone in the background. It's a convenience / deterrent, not a security control — the booking (or operator) check still applies. And for privacy, only the distance from the barrier is recorded, never the user's actual location.
---
#### 4.2 Open access: let people in without a booking
Normally an employee needs a booking to open a barrier. This lets you allow booking-free entry for this barrier — you can use either option, or both:
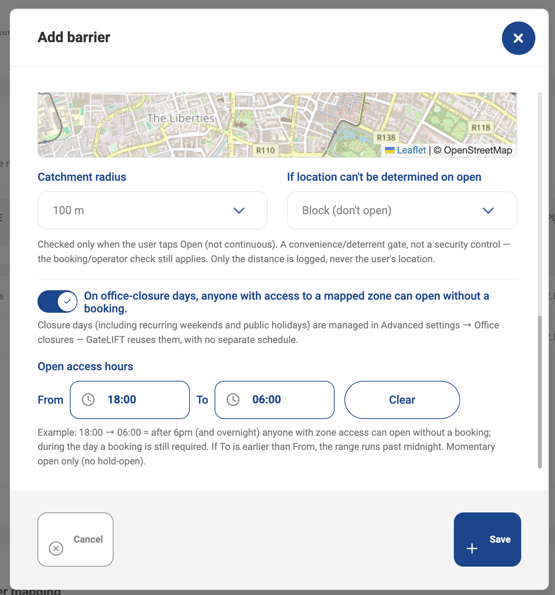
- **On office-closure days** — turn on *"On office-closure days, anyone with access to a mapped zone can open without a booking."* On any day your office is closed (weekends, public holidays, etc.), anyone with access to a zone this barrier serves can open it without booking. The closure days come straight from your existing **Advanced settings → Office closures** — GateLIFT reuses them, so there's no separate calendar to keep.
- **Open access hours** — set a daily **From / To** time range when no booking is needed. For example **18:00 → 06:00** means after 6pm (and overnight) anyone with zone access can open without a booking, while during the day a booking is still required. If **To** is earlier than **From**, the range runs **past midnight**. Leave both blank (or click **Clear**) to switch it off.
**TIP:** Both open-access options are per barrier, so you can, say, allow after-hours entry on the *exit* barrier but keep the *entry* barrier booking-only. Open access is a momentary open — it doesn't hold the gate open.
### 5. Check it works, end to end
1. Use **Test open** on each barrier (admin side).
2. Then have someone with a **booking in a mapped zone** open it from the Ronspot app — they should see an **Open** button on their booking-day card.
### 6. Troubleshooting
| Symptom | Check |
| --- | --- |
| **Controller shows Offline / Last seen "—"** | Is it powered and getting mobile signal? It connects over the mobile network via its modem. |
| **Test open does nothing** | Does the **Output** (Out 1 / Out 2) match the wiring? Is the controller **Online**? Is the barrier's **Controller** correct? |
| **Employee can't see the Open button** | They need a booking **today** in a zone that has a barrier mapped (Step 3). Operators get a persistent "Gates" screen instead. |
| **Barrier opens but won't stay up for maintenance** | Hold-open needs a barrier set to **Hold-open** mode, wired to the barrier's dedicated hold-open input. |
### 7. What your employees see
Once set up, an employee with a booking in a mapped zone sees an **Open** button in the Ronspot app on their booking day — one tap opens the barrier. **Operators** get a persistent **"Gates"** screen listing the barriers they're allowed to open.
- [User Guide](https://help.ronspot.co/user-guide?hsLang=en#main-content)
- [Quick Start](https://help.ronspot.co/user-guide?hsLang=en#quick-start)
- [Core Features](https://help.ronspot.co/user-guide?hsLang=en#core-features)
- [Advanced Features](https://help.ronspot.co/user-guide?hsLang=en#advanced-features)
- [Meetings](https://help.ronspot.co/user-guide?hsLang=en#meetings)
- [Troubleshooting](https://help.ronspot.co/user-guide?hsLang=en#troubleshooting)
- [Account Setup](https://help.ronspot.co/account-setup?hsLang=en#main-content)
- [Map Configuration](https://help.ronspot.co/account-setup?hsLang=en#map-configuration)
- [Space Management](https://help.ronspot.co/account-setup?hsLang=en#space-management)
- [Account Customisation](https://help.ronspot.co/account-setup?hsLang=en#account-customisation)
- [User Management](https://help.ronspot.co/user-management?hsLang=en#main-content)
- [User Authentication](https://help.ronspot.co/user-management?hsLang=en#user-authentication)
- [Managing Users](https://help.ronspot.co/user-management?hsLang=en#managing-users)
- [User Permissions](https://help.ronspot.co/user-management?hsLang=en#user-permissions)
- [Rules & Priorities](https://help.ronspot.co/rules-priorities?hsLang=en#main-content)
- [Confirmation & Auto-Cancellation](https://help.ronspot.co/rules-priorities?hsLang=en#confirmation-auto-cancellation)
- [Demand Management](https://help.ronspot.co/rules-priorities?hsLang=en#demand-management)
- [Priorities & Restrictions](https://help.ronspot.co/rules-priorities?hsLang=en#priorities-restrictions)
- [Integrations](https://help.ronspot.co/integrations?hsLang=en#main-content)
- [Single Sign-On](https://help.ronspot.co/integrations?hsLang=en#single-sign-on)
- [HR Systems](https://help.ronspot.co/integrations?hsLang=en#hr-systems)
- [Meeting Sync](https://help.ronspot.co/integrations?hsLang=en#meeting-sync)
- [Access Control Systems](https://help.ronspot.co/integrations?hsLang=en#access-control-systems)
- [Workplace Sensors](https://help.ronspot.co/integrations?hsLang=en#workplace-sensors)
[](https://ronspotflexwork.com/)
Download the user guide
**[Parking user guide](https://ronspotflexwork.com/ronspot-parking-user-guide-en.pdf)[Desk user guide](https://ronspotflexwork.com/ronspot-desk-user-guide-en.pdf) [M](https://ronspotflexwork.com/ronspot-meeting-user-guide-en.pdf)[eeting user guide](https://ronspotflexwork.com/ronspot-meeting-user-guide-en.pdf)**
Download the app
[](https://apps.apple.com/ie/app/ronspot-desk-parking-mgt/id1290760801) [](https://play.google.com/store/apps/details?id=ie.jemstone.ronspot&hl=en)
Ronspot Ltd, ATU iHubs, Dublin Road, Galway, H91 DCH9, Ireland — Ronspot® is a registered trademark. Copyright © 2025 Ronspot Ltd. All Rights Reserved.