---
title: How to set space availability
description: In Ronspot, you can control how far in advance a spot is available for booking and the specific time when new spots become available each day.
---
[Skip to content](https://help.ronspot.co/how-to-set-spot-availability#main-content)
[Open support ticket](https://help.ronspot.co/kb-tickets/new?hsLang=en) [Track my tickets](https://ronspot.co/customer-portal?hsLang=en)
[](https://ronspotflexwork.com/)
- [Platform](https://ronspotflexwork.com/platform/)
Show submenu for Platform
- [Parking Management System](https://ronspotflexwork.com/office-parking-management/)
- [Desk Booking System](https://ronspotflexwork.com/desk-booking-system/)
- [Meeting Room Booking System](https://ronspotflexwork.com/meeting-room-booking-system/)
- [Workplace Analytics](https://ronspotflexwork.com/workplace-analytics/)
- [Integrations](https://ronspotflexwork.com/integrations/)
- Solutions
Show submenu for Solutions
- [Employee Experience](https://ronspotflexwork.com/employee-experience/)
- [Workplace Operations](https://ronspotflexwork.com/workplace-operations/)
- [Space Planning](https://ronspotflexwork.com/space-management/)
- [Customer Case Studies](https://ronspotflexwork.com/case-studies/)
- [Pricing](https://ronspotflexwork.com/pricing/)
- Resources
Show submenu for Resources
- [Help Centre](https://help.ronspot.co/)
- [Product Updates](https://ronspotflexwork.com/feature-releases/)
- [System Status](https://ronspotflexwork.com/system-status/)
- [Contact](https://ronspotflexwork.com/contact-us/)
Open main navigation
Close main navigation
- [Platform](https://ronspotflexwork.com/platform/)
Show submenu for Platform
- [Parking Management System](https://ronspotflexwork.com/office-parking-management/)
- [Desk Booking System](https://ronspotflexwork.com/desk-booking-system/)
- [Meeting Room Booking System](https://ronspotflexwork.com/meeting-room-booking-system/)
- [Workplace Analytics](https://ronspotflexwork.com/workplace-analytics/)
- [Integrations](https://ronspotflexwork.com/integrations/)
- Solutions
Show submenu for Solutions
- [Employee Experience](https://ronspotflexwork.com/employee-experience/)
- [Workplace Operations](https://ronspotflexwork.com/workplace-operations/)
- [Space Planning](https://ronspotflexwork.com/space-management/)
- [Customer Case Studies](https://ronspotflexwork.com/case-studies/)
- [Pricing](https://ronspotflexwork.com/pricing/)
- Resources
Show submenu for Resources
- [Help Centre](https://help.ronspot.co/)
- [Product Updates](https://ronspotflexwork.com/feature-releases/)
- [System Status](https://ronspotflexwork.com/system-status/)
- [Contact](https://ronspotflexwork.com/contact-us/)
- [Open support ticket](https://help.ronspot.co/kb-tickets/new)
- [Track my tickets](https://ronspot.co/customer-portal)
- [Book a Demo](https://ronspotflexwork.com/book-a-demo/)
[Book a Demo](https://ronspotflexwork.com/book-a-demo/)
Need help with Ronspot?
- There are no suggestions because the search field is empty.
1. [Help Centre](https://help.ronspot.co/?hsLang=en)
2. [Account Setup](https://help.ronspot.co/account-setup?hsLang=en)
3. [Space Management](https://help.ronspot.co/account-setup?hsLang=en#space-management)
August 4, 2026
# How to set space availability
## In Ronspot, you can control how far in advance a space is available for booking and the specific time when new spaces become available each day.
---
### **Contents**
1. [Set availability at the group level](https://help.ronspot.co/how-to-set-spot-availability#group-configuration)
2. [Set availability for multiple spaces (bulk update)](https://help.ronspot.co/how-to-set-spot-availability#bulk-update)
3. [Set availability for an individual space](https://help.ronspot.co/how-to-set-spot-availability#space-configuration)
If you use groups, this is the easiest way to manage space availability. You can apply different availability rules to each group and even randomise availability times across the spaces within a group.
### 1. Set availability at the group level
#### 1.1. Navigate to 'Group settings'
- Log in to the [Ronspot admin panel](https://admin.ronspot.ie/).
- Navigate to `Users > Group settings`
---
#### 1.2. Select a group
- Find the group you want to configure in the list.
- Click on the group name or the edit icon in the 'Actions' column.
---
#### 1.3. Configure space availability settings
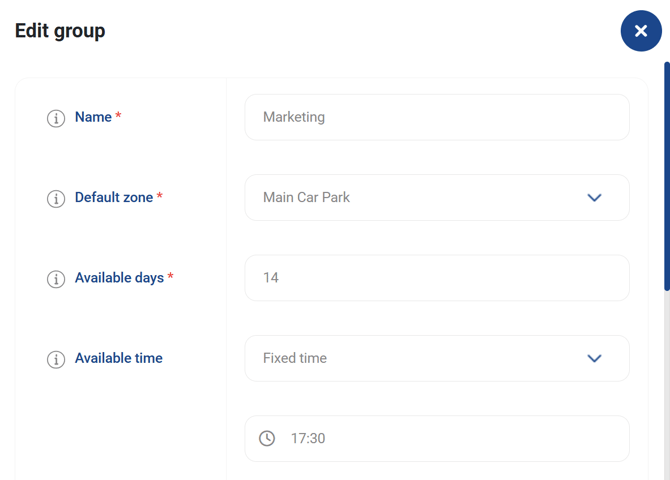
On the group’s editing page, set the following fields:
- **Available days:** This field defines how many days in advance employees in this group can make bookings in the calendar.
**Tips:** By default, this rule is based on calendar days. If you prefer to use business days and exclude weekends and public holidays from the booking window, navigate to `Spaces > Zones / Maps`, click `Edit`, go to `Advanced`, and enable the setting `Exclude closing dates from available days`.
- **Available time:** This setting specifies the exact time when a new day becomes available for booking in the calendar.
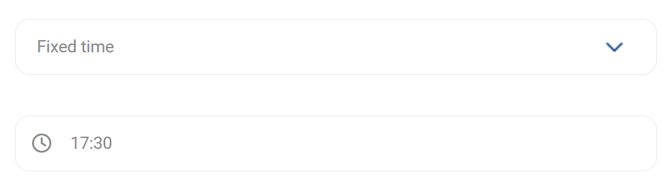
- If you choose **Fixed time**, the new day will be added to the employee’s calendar at the same time each day, based on the time you choose in the time picker.
- 
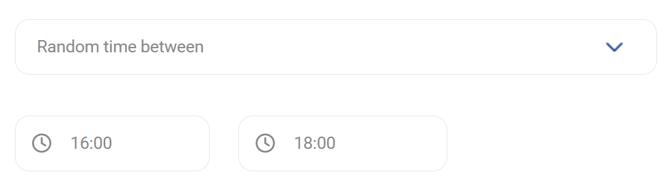
- If you choose **Random time between**, the new day will be added to the employee’s calendar at a different random time each day, within the selected time range (start time and end time).
- ****
**Example:** If you set `Available days` to 14 and `Space available time` to 17:30
- The calendar will display 14 available days before 17:30.
- The calendar will display 15 available days after 17:30.
- Click `Update`
---
#### 1.4. Repeat for other groups
If you have multiple groups to configure, repeat the above steps for each one.
### 2. Set availability for multiple spaces (bulk update)
#### 2.1. Navigate to 'Desks', 'Parking spaces', or 'Meeting rooms'
- Log in to the [Ronspot admin panel](https://admin.ronspot.ie/).
- Navigate to `Spaces > Parking Spaces / Desks / Meeting Rooms`
---
#### 2.2. Select your spaces
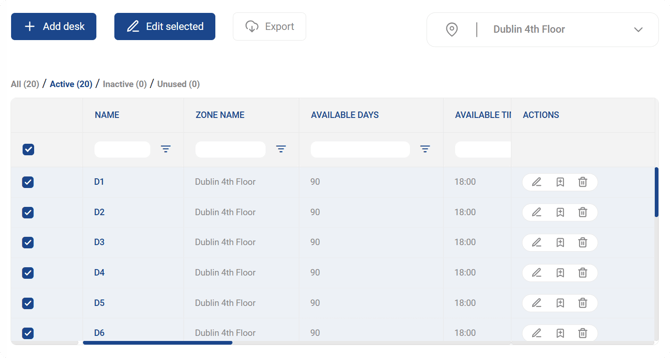
- In the left-hand column, tick the spaces you want to edit.
- To select all spaces within a zone, first choose the zone from the **Zone** selector, then use the tick box in the column header to select every space in that zone.
- Click the `Edit selected` button above the grid
---
#### 2.3. Configure the bulk edit
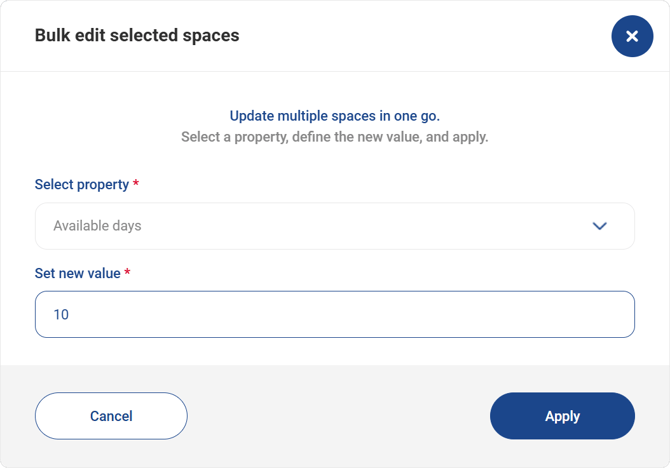
- Select the property you want to update (for example, **Available days** or **Available time**).
- Set the new value.
- Click **Apply**.
### 3. Set availability for an individual space
#### 3.1. Navigate to 'Desks', 'Parking spaces', or 'Meeting rooms'
- Log in to the [Ronspot admin panel](https://admin.ronspot.ie/).
- Navigate to `Spaces > Parking Spaces / Desks / Meeting Rooms`
---
#### 3.2. Select and edit your space
- Find the space you want to configure in the list.
- Click on the space name or the edit icon in the 'Actions' column.
---
#### 3.3. Configure space availability settings
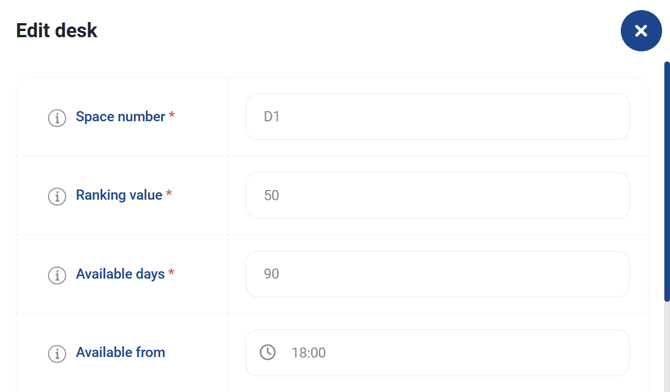
On the space’s editing page, set the following fields:
- **Available days:** This field determines the number of days in advance a space will be available for booking on the calendar.
- **Desks and parking spaces:** up to 90 days.
- **Meeting rooms:** up to 365 days.
**Tips:**
- By default, this rule is based on calendar days. If you prefer to use business days and exclude weekends and public holidays from the booking window, navigate to `Spaces > Zones / Maps`, click `Edit`, go to `Advanced`, and enable the setting `Exclude closing dates from available days`.
- This rule applies to all users. To set booking priorities by restricting the booking window for specific users, we recommend creating different user groups in `Users > Group settings` and configuring the `Available days` limit within each group’s settings.
- **Space available time:** This setting specifies the exact time when a new day becomes available for booking in the calendar.
**Example:** If you set `Available days` to 7 and `Space available time` to 18:00
- The calendar will display 7 available days before 18:00.
- The calendar will display 8 available days after 18:00.
- Click `Update`
---
#### 3.4. Repeat for other spaces
If you have multiple spaces to configure, repeat the above steps for each one.
By following these instructions, you can effectively manage how far in advance spaces are available for booking and ensure that new availability aligns with your organisation's needs.
- [User Guide](https://help.ronspot.co/user-guide?hsLang=en#main-content)
- [Quick Start](https://help.ronspot.co/user-guide?hsLang=en#quick-start)
- [Core Features](https://help.ronspot.co/user-guide?hsLang=en#core-features)
- [Advanced Features](https://help.ronspot.co/user-guide?hsLang=en#advanced-features)
- [Meetings](https://help.ronspot.co/user-guide?hsLang=en#meetings)
- [Troubleshooting](https://help.ronspot.co/user-guide?hsLang=en#troubleshooting)
- [Account Setup](https://help.ronspot.co/account-setup?hsLang=en#main-content)
- [Map Configuration](https://help.ronspot.co/account-setup?hsLang=en#map-configuration)
- [Space Management](https://help.ronspot.co/account-setup?hsLang=en#space-management)
- [Account Customisation](https://help.ronspot.co/account-setup?hsLang=en#account-customisation)
- [User Management](https://help.ronspot.co/user-management?hsLang=en#main-content)
- [User Authentication](https://help.ronspot.co/user-management?hsLang=en#user-authentication)
- [Managing Users](https://help.ronspot.co/user-management?hsLang=en#managing-users)
- [User Permissions](https://help.ronspot.co/user-management?hsLang=en#user-permissions)
- [Rules & Priorities](https://help.ronspot.co/rules-priorities?hsLang=en#main-content)
- [Confirmation & Auto-Cancellation](https://help.ronspot.co/rules-priorities?hsLang=en#confirmation-auto-cancellation)
- [Demand Management](https://help.ronspot.co/rules-priorities?hsLang=en#demand-management)
- [Priorities & Restrictions](https://help.ronspot.co/rules-priorities?hsLang=en#priorities-restrictions)
- [Integrations](https://help.ronspot.co/integrations?hsLang=en#main-content)
- [Single Sign-On](https://help.ronspot.co/integrations?hsLang=en#single-sign-on)
- [HR Systems](https://help.ronspot.co/integrations?hsLang=en#hr-systems)
- [Meeting Sync](https://help.ronspot.co/integrations?hsLang=en#meeting-sync)
- [Access Control Systems](https://help.ronspot.co/integrations?hsLang=en#access-control-systems)
- [Workplace Sensors](https://help.ronspot.co/integrations?hsLang=en#workplace-sensors)
[](https://ronspotflexwork.com/)
Download the user guide
**[Parking user guide](https://ronspotflexwork.com/ronspot-parking-user-guide-en.pdf)[Desk user guide](https://ronspotflexwork.com/ronspot-desk-user-guide-en.pdf) [M](https://ronspotflexwork.com/ronspot-meeting-user-guide-en.pdf)[eeting user guide](https://ronspotflexwork.com/ronspot-meeting-user-guide-en.pdf)**
Download the app
[](https://apps.apple.com/ie/app/ronspot-desk-parking-mgt/id1290760801) [](https://play.google.com/store/apps/details?id=ie.jemstone.ronspot&hl=en)
Ronspot Ltd, ATU iHubs, Dublin Road, Galway, H91 DCH9, Ireland — Ronspot® is a registered trademark. Copyright © 2025 Ronspot Ltd. All Rights Reserved.