---
title: "DeskSYNC: Automatic office check-in (Administrator Guide)"
description: Step-by-step admin guide to configuring DeskSync auto checkin for Ronspot. Set up Wi-Fi mappings, zone assignments, and enable automatic office check-in.
---
[Skip to content](https://help.ronspot.co/desksync-automatic-office-check-in-administrator-guide#main-content)
[Open support ticket](https://help.ronspot.co/kb-tickets/new?hsLang=en) [Track my tickets](https://ronspot.co/customer-portal?hsLang=en)
[](https://ronspotflexwork.com/)
- [Platform](https://ronspotflexwork.com/platform/)
Show submenu for Platform
- [Parking Management System](https://ronspotflexwork.com/office-parking-management/)
- [Desk Booking System](https://ronspotflexwork.com/desk-booking-system/)
- [Meeting Room Booking System](https://ronspotflexwork.com/meeting-room-booking-system/)
- [Workplace Analytics](https://ronspotflexwork.com/workplace-analytics/)
- [Integrations](https://ronspotflexwork.com/integrations/)
- Solutions
Show submenu for Solutions
- [Employee Experience](https://ronspotflexwork.com/employee-experience/)
- [Workplace Operations](https://ronspotflexwork.com/workplace-operations/)
- [Space Planning](https://ronspotflexwork.com/space-management/)
- [Customer Case Studies](https://ronspotflexwork.com/case-studies/)
- [Pricing](https://ronspotflexwork.com/pricing/)
- Resources
Show submenu for Resources
- [Help Centre](https://help.ronspot.co/)
- [Product Updates](https://ronspotflexwork.com/feature-releases/)
- [System Status](https://ronspotflexwork.com/system-status/)
- [Contact](https://ronspotflexwork.com/contact-us/)
Open main navigation
Close main navigation
- [Platform](https://ronspotflexwork.com/platform/)
Show submenu for Platform
- [Parking Management System](https://ronspotflexwork.com/office-parking-management/)
- [Desk Booking System](https://ronspotflexwork.com/desk-booking-system/)
- [Meeting Room Booking System](https://ronspotflexwork.com/meeting-room-booking-system/)
- [Workplace Analytics](https://ronspotflexwork.com/workplace-analytics/)
- [Integrations](https://ronspotflexwork.com/integrations/)
- Solutions
Show submenu for Solutions
- [Employee Experience](https://ronspotflexwork.com/employee-experience/)
- [Workplace Operations](https://ronspotflexwork.com/workplace-operations/)
- [Space Planning](https://ronspotflexwork.com/space-management/)
- [Customer Case Studies](https://ronspotflexwork.com/case-studies/)
- [Pricing](https://ronspotflexwork.com/pricing/)
- Resources
Show submenu for Resources
- [Help Centre](https://help.ronspot.co/)
- [Product Updates](https://ronspotflexwork.com/feature-releases/)
- [System Status](https://ronspotflexwork.com/system-status/)
- [Contact](https://ronspotflexwork.com/contact-us/)
- [Open support ticket](https://help.ronspot.co/kb-tickets/new)
- [Track my tickets](https://ronspot.co/customer-portal)
- [Book a Demo](https://ronspotflexwork.com/book-a-demo/)
[Book a Demo](https://ronspotflexwork.com/book-a-demo/)
Need help with Ronspot?
- There are no suggestions because the search field is empty.
1. [Help Centre](https://help.ronspot.co/?hsLang=en)
2. [User Guide](https://help.ronspot.co/user-guide?hsLang=en)
3. [Advanced Features](https://help.ronspot.co/user-guide?hsLang=en#advanced-features)
September 25, 2026
# DeskSYNC: Automatic office check-in (Administrator Guide)
## Set up DeskSYNC in Ronspot so your team is automatically checked in on arrival. Complete admin guide for Wi-Fi, Ethernet, and docking station.
---
### Contents
1. [What is DeskSYNC?](https://help.ronspot.co/desksync-automatic-office-check-in-administrator-guide#whats-desksync)
2. [How it works](https://help.ronspot.co/desksync-automatic-office-check-in-administrator-guide#how-it-works)
3. [Before you begin](https://help.ronspot.co/desksync-automatic-office-check-in-administrator-guide#before-you-begin)
4. [How to configure DeskSYNC](https://help.ronspot.co/desksync-automatic-office-check-in-administrator-guide#how-to-configure-desksync)
5. [Troubleshooting](https://help.ronspot.co/desksync-automatic-office-check-in-administrator-guide#troubleshooting)
6. [Privacy note](https://help.ronspot.co/desksync-automatic-office-check-in-administrator-guide#privacy-note)
### What is DeskSYNC?
DeskSYNC is Ronspot's lightweight desktop app for Windows and Mac. It runs quietly as a background agent on an employee's laptop and automatically checks them in to their Ronspot booking when it detects they're at the office. No app to open, no button to press.
Instead of relying on the employee to remember to check in (from the web app, the mobile app, or a QR code at the door), DeskSYNC recognises the office from signals the laptop already sees, the office WiFi Network or a docking station / wired connection, and confirms the booking on their behalf.
#### **Why use it:**
- **Higher check-in accuracy:** Attendance data reflects who actually came in, because check-in is automatic rather than self-reported.
- **Zero friction for employees**: They just open their laptop at their desk; DeskSYNC does the rest.
- **Works for desks and parking**, Wi-Fi-based and docking-station-based offices.
- **Admin-controlled**: you decide which networks and docks count as "the office." Nothing is hard-coded in the app.
### 2. How it works (in one minute)
1. You configure, in the Ronspot admin panel, which Wi-Fi networks and/or docking stations represent each office zone.
2. Ronspot sends that configuration down to the employee's DeskSYNC app.
3. When the laptop is on a matching network (or connected to a matching dock), DeskSYNC reports what it sees to Ronspot, and Ronspot decides whether it's a valid office presence and checks the user in against their booking.
The app is deliberately "thin": it reports the signals it observes and the Ronspot server makes the decision. This keeps the logic centralised and means a configuration change takes effect without updating the app.
#### **Check-in only happens when all of these are true:**
- the employee has a **booking for that day** in a zone they belong to
- that zone has the relevant **check-in type enabled** (Wi-Fi or Ethernet/Network)
- and the laptop is on the configured network / dock for that zone.
### 3. Before you begin
Make sure you have:
1. Administrator access to the Ronspot admin panel.
2. Your zones and spaces already set up, and employees assigned to the correct zones.
3. The Wi-Fi details of each office you want to map (the network name/SSID, or the access-point MAC/BSSID), or the docking-station details for a wired/dock office.
4. Employees who will book spaces as normal, DeskSYNC confirms an existing booking, it does not create one.
### 4. How to configure DeskSYNC
#### Step 1: Choose how each office is detected
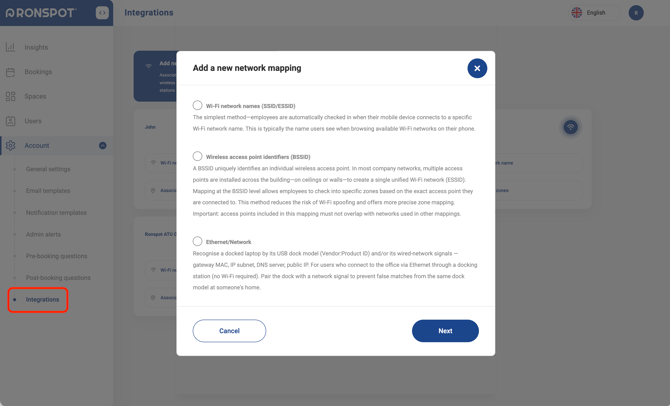
DeskSYNC supports three mapping types. Pick the one that fits each office:
| **Mapping type** | **Best for** | **What it matches on** |
| --- | --- | --- |
| **SSID** (Wi-Fi name) | Most offices with a single, stable Wi-Fi name | The network name, e.g. \`HQ-Staff\` |
| **BSSID** (access-point MAC) | Sites where you want to pin to specific access points | The AP hardware address, e.g. \`58:ba:d4:74:0a:b0\` |
| **Ethernet/Network** | Desks that connect via a dock / wired Ethernet | The dock's USB ID plus network anchors |
**SSID vs BSSID**: an SSID mapping matches anywhere that Wi-Fi name is broadcast. A BSSID mapping is stricter, it matches a specific access point. Use SSID for simplicity; use BSSID when you need to distinguish floors or buildings that share a network name.
---
Pick one of the three methods below: Step 2a, 2b or 2c.
**Note:** You can combine detection methods. For example, to detect both WiFi and wired Ethernet, finish setting up one mapping, return to the main screen, and start again for the other.
#### Step 2a: Add a Wi-Fi mapping (SSID or BSSID)
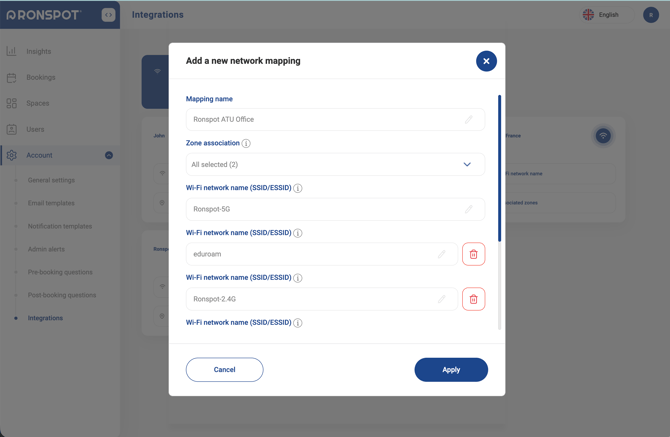
1. In the Ronspot admin panel, open the Wi-Fi check-in settings for the company.
2. Add a new mapping and choose SSID or BSSID.
3. Enter the value:
1. **SSID**: the exact Wi-Fi network name (case and spacing don't have to be perfect, but avoid typos).
2. **BSSID**: the access point's MAC address.
4. Assign the mapping to the zone(s) it represents.
5. Save.
**Tip**: you can map several networks to the same office (for example a \`2.4 GHz\` and a \`5 GHz\` version of the same Wi-Fi, or multiple access points), and the same network to several zones if they share it.
---
#### Step 2b: Add a Docking Station (Ethernet/Network method)
#### 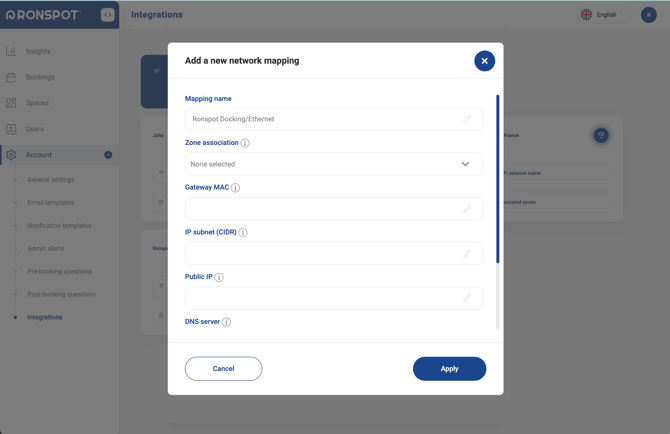
Use this for desks where people dock their laptop rather than join Wi-Fi.
1. Read the dock's USB ID. On a laptop connected to the dock, open DeskSYNC in administrator mode and use the Detected USB devices panel to read the dock's VID:PID (for example \`0x17EF:0x30B0\`). This value is local to the laptop and is only used to identify the dock model.
2. In the admin panel, add a Docking station mapping and enter the dock's VID/PID.
3. Optionally add network anchors for the office (gateway MAC address, subnet (CIDR), public IP, and/or DNS server). These make the match stronger and prevent the same dock model at someone's home from counting as the office.
4. Assign the mapping to the zone(s) and save.
Docking-station check-in records as an **Ethernet/Network** check-in.
---
#### Step 2c: Add a network cable (Ethernet/Network method)
#### 
Use this for desks where people plug a network cable directly into their laptop, with no docking station.
DeskSYNC recognises a wired office connection from network details the laptop can see once it's plugged in. You choose which of these details identify the office:
| **Field** | **What it is** | **Example** |
| --- | --- | --- |
| **Gateway MAC** | The hardware address of the office router or gateway | `2c:b8:ed:8e:8d:84` |
| **IP subnet (CIDR)** | The office's internal address range | `10.20.0.0/16` |
| **Public IP** | The address the office uses to reach the internet | `203.0.113.45` |
| **DNS server** | The DNS server the office network hands out | `10.20.0.2` |
1. In the Ronspot admin panel, open **Add a new network mapping**.
2. Fill in one or more of the fields above.
3. Leave the **Docking stations** fields empty.
4. Assign the mapping to the zone(s) it represents.
5. Click **Apply**.
**How matching works: every field you fill in must match**
DeskSYNC only confirms office presence when **all** of the fields you've filled in match what the laptop sees. Empty fields are ignored.
- If you fill in only **Public IP**, a matching public IP is enough to confirm presence.
- If you fill in **Public IP** and **DNS server**, both must match. A matching public IP with a different DNS server does not count.
- If you fill in all four fields, all four must match.
Adding more fields makes detection stricter and less likely to give a false match. It also means that if any one value changes on your network, check in will stop until you update the mapping.
**Choosing which fields to use**
- **Gateway MAC** is the most reliable single field, because it identifies a specific piece of office hardware.
- **Public IP** alone can match people who aren't in the office, for example remote staff on a full tunnel VPN or anyone using the same internet connection. Combine it with another field where possible.
- **IP subnet** and **DNS server** alone are weak signals if they use common home ranges or public resolvers, for example `192.168.1.0/24` or `8.8.8.8`, because they can match home networks.
Wired Ethernet check in records as an **Ethernet/Network** check in. As with docking stations, the zone must have **Ethernet/Network** check in enabled (see Step 4).
Direct Ethernet cable check-in records as an **Ethernet/Network** check-in.
---
#### Step 3: Enable the check-in type on the zone (important)
#### 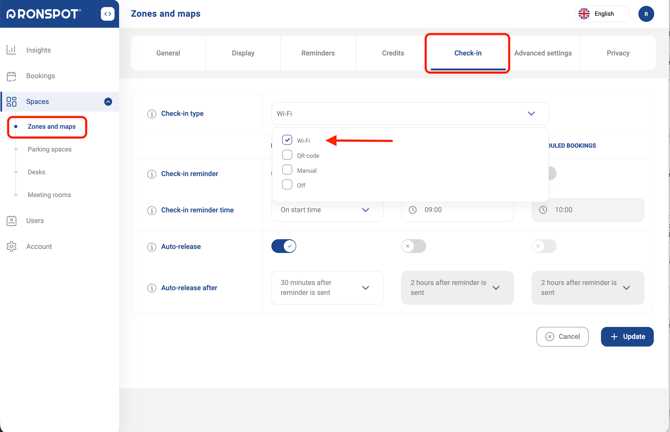
A mapping only takes effect if the zone has the matching check-in type switched on:
- For **SSID/BSSID** mappings → enable **Wi-Fi** check-in on the zone.
- For **Docking-station** mappings → enable **Ethernet/Network** check-in on the zone.
This is the most common reason a correctly-added mapping doesn't work: the network is mapped, but the zone's check-in type is off, so it's never sent to the app. If DeskSYNC says "Outside office network" on a network you've just mapped, check this first.
---
#### Step 4: Roll out the app to employees
1. Have employees install DeskSYNC on their laptop (from your internal distribution link).
2. On first launch they sign in with their normal Ronspot account.
3. After that it runs automatically in the background and starts on login.
Employees don't need to configure anything, they only sign in once.
**Windows Location Services must be on**. Windows only reveals the Wi-Fi network name to apps when Location Services is enabled. DeskSYNC shows an amber banner with an 'Enable' button if it's switched off.
---
#### **Step 5: Verify it's working**
1. On an employee laptop that's booked for today and on the office Wi-Fi (or docked), open DeskSYNC.
2. The status should read **"Connected to office network"** and, once checked in, **"Checked In"**. Docking-station offices also show **"Docking station: Connected."**
3. Confirm the check-in appears against the booking in Ronspot as normal.
DeskSYNC re-checks automatically on common events, connecting to Wi-Fi, switching networks, plugging in the dock, unlocking the laptop, and on a regular timer, so it doesn't rely on the employee doing anything.
### **5. Troubleshooting**
#### **5.1 "Outside office network" on a network you've mapped**
1. Confirm the mapping is assigned to a zone the employee belongs to.
2. Confirm the zone's check-in type is enabled (Wi-Fi for SSID/BSSID, Ethernet/Network for docks). See Step 4.
3. Have the employee use Sync Now in the app (or restart it) so it re-fetches the latest configuration.
#### **5.2 Check-in doesn't happen even though the office is detected**
The employee must have a booking for that day in that zone. "No booking for today" is expected when they haven't booked.
#### **5.3 Wi-Fi name shows as blank / office not detected on Windows**
Check Location Services is on (both the master switch and "Let desktop apps access your location").
#### **5.4 Nothing detected after plugging in a dock**
Give it a few seconds. DeskSYNC waits for the dock's USB devices to finish enumerating, then re-checks automatically.
### **6. Privacy note**
DeskSYNC reports only what's needed to confirm office presence:
- the observed Wi-Fi name/access point
- basic network details (gateway, DNS)
- and, for docking-station offices, the connected dock's model ID (VID/PID, no serial numbers)
It does not track location beyond confirming the configured office, and diagnostic data is cleared when a user signs out.
**Need help configuring DeskSYNC for your offices? Contact the [Ronspot support](https://ronspotflexwork.com/contact-us/customer-support/) team.**
- [User Guide](https://help.ronspot.co/user-guide?hsLang=en#main-content)
- [Quick Start](https://help.ronspot.co/user-guide?hsLang=en#quick-start)
- [Core Features](https://help.ronspot.co/user-guide?hsLang=en#core-features)
- [Advanced Features](https://help.ronspot.co/user-guide?hsLang=en#advanced-features)
- [Meetings](https://help.ronspot.co/user-guide?hsLang=en#meetings)
- [Troubleshooting](https://help.ronspot.co/user-guide?hsLang=en#troubleshooting)
- [Account Setup](https://help.ronspot.co/account-setup?hsLang=en#main-content)
- [Map Configuration](https://help.ronspot.co/account-setup?hsLang=en#map-configuration)
- [Space Management](https://help.ronspot.co/account-setup?hsLang=en#space-management)
- [Account Customisation](https://help.ronspot.co/account-setup?hsLang=en#account-customisation)
- [User Management](https://help.ronspot.co/user-management?hsLang=en#main-content)
- [User Authentication](https://help.ronspot.co/user-management?hsLang=en#user-authentication)
- [Managing Users](https://help.ronspot.co/user-management?hsLang=en#managing-users)
- [User Permissions](https://help.ronspot.co/user-management?hsLang=en#user-permissions)
- [Rules & Priorities](https://help.ronspot.co/rules-priorities?hsLang=en#main-content)
- [Confirmation & Auto-Cancellation](https://help.ronspot.co/rules-priorities?hsLang=en#confirmation-auto-cancellation)
- [Demand Management](https://help.ronspot.co/rules-priorities?hsLang=en#demand-management)
- [Priorities & Restrictions](https://help.ronspot.co/rules-priorities?hsLang=en#priorities-restrictions)
- [Integrations](https://help.ronspot.co/integrations?hsLang=en#main-content)
- [Single Sign-On](https://help.ronspot.co/integrations?hsLang=en#single-sign-on)
- [HR Systems](https://help.ronspot.co/integrations?hsLang=en#hr-systems)
- [Meeting Sync](https://help.ronspot.co/integrations?hsLang=en#meeting-sync)
- [Access Control Systems](https://help.ronspot.co/integrations?hsLang=en#access-control-systems)
- [Workplace Sensors](https://help.ronspot.co/integrations?hsLang=en#workplace-sensors)
[](https://ronspotflexwork.com/)
Download the user guide
**[Parking user guide](https://ronspotflexwork.com/ronspot-parking-user-guide-en.pdf)[Desk user guide](https://ronspotflexwork.com/ronspot-desk-user-guide-en.pdf) [M](https://ronspotflexwork.com/ronspot-meeting-user-guide-en.pdf)[eeting user guide](https://ronspotflexwork.com/ronspot-meeting-user-guide-en.pdf)**
Download the app
[](https://apps.apple.com/ie/app/ronspot-desk-parking-mgt/id1290760801) [](https://play.google.com/store/apps/details?id=ie.jemstone.ronspot&hl=en)
Ronspot Ltd, ATU iHubs, Dublin Road, Galway, H91 DCH9, Ireland — Ronspot® is a registered trademark. Copyright © 2025 Ronspot Ltd. All Rights Reserved.