
A step-by-step guide to installing physical desk sensors as part of the Ronspot solution.
Ronspot's desk occupancy uses small wireless sensors fitted under each desk to report in real time whether a desk is occupied. The data flows silently into Ronspot and powers live occupancy dashboards, auto-release of no-show bookings, and workplace analytics.
This guide covers everything your facilities or IT team needs to get the sensors installed and registered, no specialist tools or networking skills required.
Contents
- How it works
- What's in the box
- Before you begin
- How to install desk sensors
- Installation checklist
- Troubleshooting
- Technical reference
1. How it works
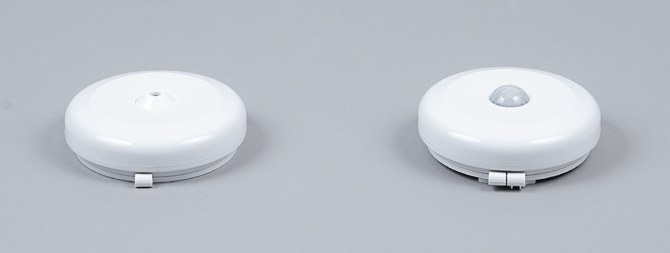
Each sensor is a passive infrared (PIR) motion detector that fits under the desk surface. It communicates wirelessly over a low-power IoT network (either Sigfox or LoRaWAN, depending on your setup). The sensors do not connect to your office Wi-Fi and do not require any cabling.
A small network device called a gateway receives the signals from all sensors in its range and forwards the occupancy data securely to Ronspot. A single gateway typically covers an entire floor. Ronspot handles everything on the cloud side — there is nothing to configure on your network beyond placing the gateway.
Battery life: The sensors are powered by two AA lithium batteries that last up to ten years under normal desk conditions. Battery replacement is not a routine maintenance task
2. What's in the box
| Item | Notes |
|---|---|
| Connected Inventions Detectify sensor | PIR motion detector, 98 mm diameter, 30 mm height. White ABS plastic. Two AA lithium batteries pre-installed. |
| Mounting plate | Included. The sensor twists into the plate and locks. Can be attached with the supplied double-sided tape or with screws (screws not included). |
| Double-sided adhesive tape | Pre-cut, included in the box. Suitable for the underside of most standard desk surfaces. |
| Angle joint support | Alternative bracket included for angled installation positions. |
Note: The gateway device is shipped separately, not in the individual sensor boxes. See the gateway section below.
3. Before you begin
- Confirm with Ronspot which network type your gateway uses, Sigfox or LoRaWAN. The sensors support both, and yours will be pre-set at the factory.
- Prepare a spreadsheet (Excel or CSV) with two columns: Sensor ID and Desk number. You will fill this in as you install each sensor. See the Sensor ID mapping section below.
- Ensure the gateway has been installed in the space before switching any sensors on, see the Gateway section below.
4. How to install desk sensors
Step 1: Install the gateway
The gateway is a small plug-in device that receives signals from all sensors in its area and sends the data to Ronspot. You need at least one gateway per floor.
- Place the gateway in a central location on the floor — on top of a cabinet, on a shelf, or mounted on a wall.
- It needs a power outlet and, if using LoRaWAN, an unobstructed position for best coverage. Avoid placing it inside metal cabinets or directly behind large structural columns.
- Plug it in. No further configuration is required on site. Ronspot will confirm remotely once it is online.
One gateway typically covers an entire open-plan floor of standard office construction. In buildings with heavy concrete partitions or multiple separated rooms, an additional gateway per zone may be needed. Ronspot can advise based on your floor plan.
Step 2: Record the sensor ID before mounting
Every sensor has a unique identifier printed on the label on its base. You will need this to tell Ronspot which sensor corresponds to which desk.
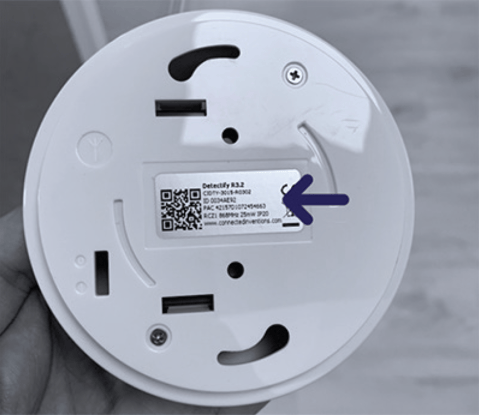
- Before fitting each sensor, note the Sensor ID (also called the Sigfox ID or LoRa DevEUI, depending on your network). It is printed on the base label. You can also scan the QR code on the label with a phone to retrieve it.
- Record it alongside the desk number or desk label in your spreadsheet.
| Column A — Sensor ID | Column B — Desk number |
|---|---|
| AB12CD34 | D-01 |
| EF56GH78 | D-02 |
| IJ90KL12 | D-03 |
Once all sensors are installed, send the completed spreadsheet to support@ronspotflexwork.com and Ronspot will map each sensor to the correct desk in the platform.
Step 3: Attach the mounting plate
The mounting plate attaches to the underside of the desk. The sensor then twists into the plate.
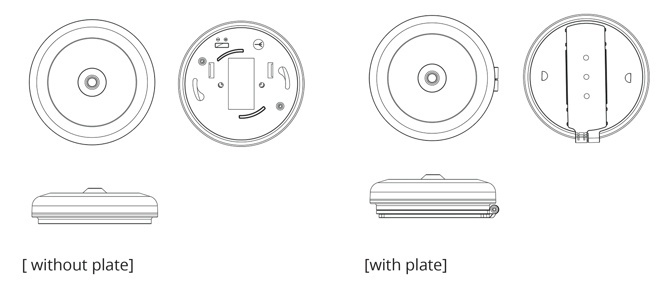
- Turn the desk upside-down or reach under it to access the underside of the surface.
- Choose a position roughly centred on the desk, set back about 20–30 cm from the front edge. This gives the sensor a clear view of the seated position.
- Tape method (recommended — used by 85% of installations): peel the backing from the double-sided tape, press the mounting plate firmly to the underside of the desk surface, and hold for 30 seconds. No tools needed.
- Screw method (optional): use the screw holes in the plate if a more permanent fixing is preferred. Use short wood screws appropriate to your desk surface.
Important: Keep the sensor at least 15 cm away from metal brackets, cable trays, power strips, or any metal part of the desk frame. Metal close to the sensor can degrade radio performance.
Step 4: Switch the sensor on and attach it
- On the base of the sensor, locate the small network mode switch. Use a small flat-head screwdriver to confirm it is set to the correct position:
SF— for SigfoxLR— for LoRaWAN
- Slide the power switch to the
I(on) position.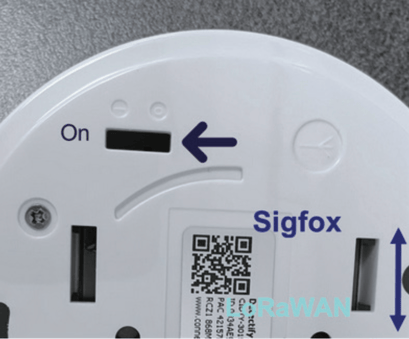
- Align the pins on the base of the sensor with the twist-holes on the mounting plate.
- Twist the sensor clockwise until it clicks and locks into place.
Tip: For desks with a metal frame or support running underneath, position the mounting plate so the flat hinge edge of the plate aligns with the metal structure, and ensure the sensor antenna faces away from it.
Step 5: Send the mapping spreadsheet to Ronspot
Once all sensors are installed and switched on, send your completed spreadsheet to support@ronspotflexwork.com. Include:
- The Sensor ID for each device
- The corresponding desk number or label as it appears in Ronspot
- The floor or zone name if you have sensors across multiple areas
Ronspot will complete the mapping in the platform and confirm when sensors are live. First messages from sensors typically appear within a few minutes of switching them on, provided the gateway is already online.
5. Installation checklist
- Gateway installed on the floor and confirmed online by Ronspot
- Sensor ID recorded for every sensor before mounting
- Desk number recorded alongside each Sensor ID in the spreadsheet
- Mounting plate attached at least 15 cm clear of metal objects
- Network mode switch confirmed in correct position (
SForLR) - Power switch moved to
I(on) - Sensor twisted clockwise into plate until locked
- Spreadsheet sent to support@ronspotflecwork.com
6. Troubleshooting
| Symptom | Check |
|---|---|
| Sensor not appearing in Ronspot after installation | Confirm the power switch is in the I position. Confirm the network mode switch matches your network type. Confirm the gateway is powered and online. If using LoRaWAN, allow up to 24 hours for the first join. |
| Sensor data shows no activity at a known-occupied desk | Check the sensor is positioned to face the seated area and is not obscured. Confirm it is not too close to a metal surface. The sensor detects motion, not static presence — occasional movement at the desk is needed to register occupancy. |
| Sensor keeps falling off | Ensure the desk underside surface was clean and dry before applying the tape. Press firmly for at least 30 seconds on application. Screw fixing is available as an alternative. |
| Mapping is incorrect, wrong sensor on wrong desk | Send a corrected spreadsheet to support@ronspotflexwork.com with the accurate Sensor ID to desk pairings. Ronspot will update the mapping. |
7. Technical reference
| Specification | Detail |
|---|---|
| Sensor technology | Passive infrared (PIR) |
| Detection range | Up to 5 metres |
| Detection angle | 30 degrees (narrow, desk-focused) |
| Size | 98 mm diameter, 30 mm height |
| Weight | 110 g |
| Battery | 2 x AA 3.6 V lithium (pre-installed) |
| Battery life | Up to 10 years |
| Connectivity | Sigfox or LoRaWAN (user-selectable) |
| Operating temperature | 0–50 °C |
| Certifications | CE, FCC, Sigfox Class 0U, LoRa Alliance |
| Manufacturer | Connected Inventions — Detectify |
-
For questions about your sensor deployment, contact support@ronspotflexwok.com or open a ticket at help.ronspot.co.
-
Technical Specification Guide available to download here
-
Where this guide conflicts with physical labels on the device, the device label takes precedence.