Table of contents
1. What are credits for?
Credits are virtual tokens that help regulate booking activities by:
- Limiting bookings: Restricting the number of bookings an employee can make in advance each week or month.
- Preventing overbooking: Ensuring no single employee monopolises booking slots.
- Ensuring fair access: Giving all employees equal chances to book spaces.
- Encouraging booking releases: Motivating users to cancel their bookings if they’re not coming, which allows them to get their credits back.
2. Setting up the credit system
Step 1: Navigate to 'Zones and maps'
- Log in to the Ronspot admin panel.
- Navigate to
Spaces > Zones and maps.
Step 2: Select and edit the zone
- Choose the zone you want to configure by clicking on it.
- Click on the zone name or pencil icon to enter the zone settings.
Step 3: Go to the 'Credits' tab
- In the zone settings, click on the
Creditstab.
Step 4: Configure the following fields:

Credit system:- Toggle this option to "Yes" to enable the credit system.
- If set to "No", the credit system will be disabled.
-
Booking cost:-
Specify the number of credits required for employees to make a booking
-
Recommended setting: 1 credit per booking.
-
Credit required on:- Select the days of the week when booking a spot in this zone will require a credit.
- To select a day: Click on the letter representing the day (e.g.,
Mfor Monday). The background will turn green when selected. - To deselect a day: Click on the letter again, and the background will turn white.
- To select a day: Click on the letter representing the day (e.g.,
- Select the days of the week when booking a spot in this zone will require a credit.
Credit required until:- Select the time after which employees can book a space for the next day without using credits. This helps encourage last-minute bookings and maximise occupancy.
- To require credits at all times, move the slider fully to the right until it displays
Always.
Credit refund — Cancel before:- Determine the time frame within which employees must cancel their booking to receive a credit refund.
- Full refund: Select the time before which users must cancel their booking to gain a full credit refund.
- Half refund: Select the time before which users must cancel their booking to gain a half credit refund.
-
Prevent credit accumulation:- Enable this option to ensure that employees only receive a credit refund if they cancel their booking within the same cycle (week or month) the booking was made.
- We recommend enabling this option to prevent users from storing unused credits
- Click on the
Updatebutton to save your configurations.
3. Allocate credits individually
Step 1: Access the employee settings:
- In the sidebar menu, click on
Users > Employees.
Step 2: Set credit allocations:
Credit balance: Enter the number of credits the employee currently has in their account.Credit refill: Specify the number of credits the employee will automatically receive at the start of each month or week.Credit refill cycle: Select the frequency at which the employee will receive credits: Monthly (first of every month) or Weekly (every Monday).-
Save the changes: Click outside the cell to save your changes.
4. Allocate credits in bulk (group settings)
Step 1: Access 'Group settings':
- In the sidebar menu, click on
Users > Group Settings.
Step 2: Edit or create a group:
- Click on the pencil icon to edit an existing group or create a new one.
Step 3: Set group credit allocations:
Credit refill:Enter the number of credits that members of this group will automatically receive each month or week.Credit refill cycle: Choose the frequency at which the group's credits will reset:- Monthly (default): Credits reset on the 1st of every month.
- Weekly: Credits reset every Sunday.
Default credit balance:Specify the number of credits group members will receive when they join the group.- Click on the
Savebutton to save your group configuration.

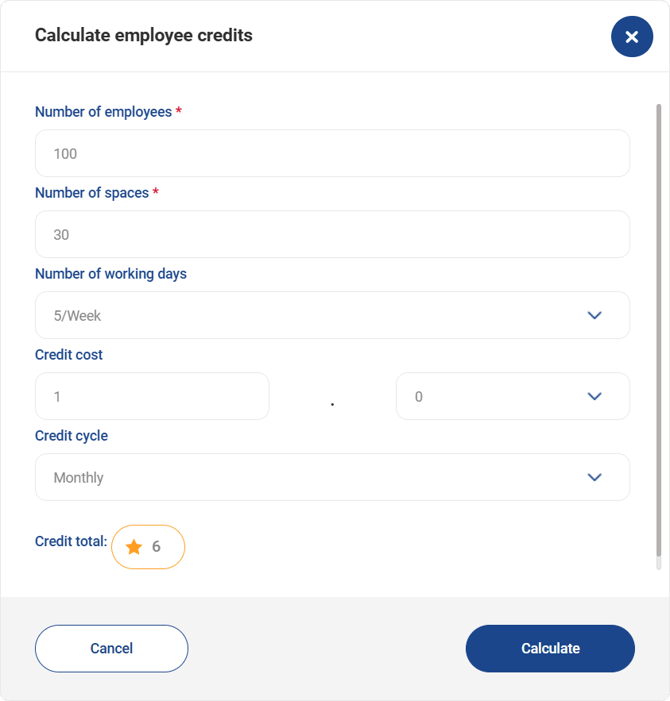
5. How to calculate employee credits?
If you're unsure how many credits to allocate, use our Credit Calculator.
Step 1: Navigate to 'Zones and maps'
- Log in to the Ronspot admin panel.
- Navigate to
Spaces > Zones and maps.
Step 2: Select and edit the zone
- Choose the zone you want to configure by clicking on it.
- Click on the zone name or pencil icon to enter the zone settings.
Step 3: Click on 'Calculate employee credits'
- In the zone settings, click on the
Creditstab. - Then Click on the link Calculate employee credits under the
Booking cost
Step 4: Set the calculation
-
Number of employees: Specify how many employees will use the Ronspot app. -
Number of spaces: Define the number of bookable spaces available via credits on Ronspot. -
Number of working days: Select how many days per week your office is open. -
Credit cost: Choose the 'Credit cost' set on the previous page. -
Credit cycle: Decide how often credits are automatically allocated to employees—weekly or monthly. -
Click
Calculateto proceed, the total of credits per employee will be displayed at the bottom of the page.
By following these steps, you can efficiently manage booking demand within your organisation, prevent overbooking, and ensure that all employees have fair access to office space. The credit system not only helps regulate bookings but also encourages responsible use of office resources.