
Step 1: Log on to the Duo admin panel
- Open your web browser and navigate to the Duo admin panel.
- Enter your credentials to log in.
Step 2: Navigate to ‘Applications’
- Once logged in, go to the
Applicationssection from the Duo dashboard.
Step 3: Click ‘Protect an Application’
-
In the Applications section, click on
Protect an Application. -
Search for
Generic SAML Service Providerin the list. -
Click
Protectto start the configuration process.
Step 4: Copy the Duo SAML Identity Provider Information
- Navigate to the
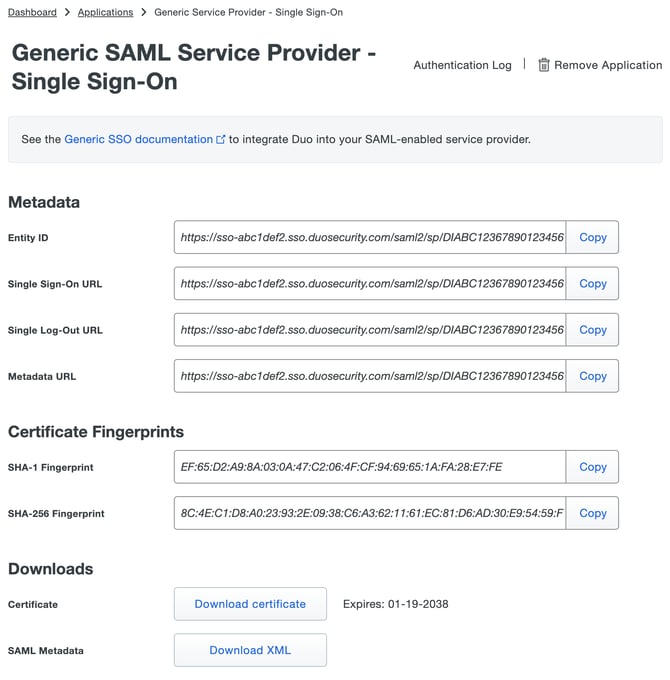
Metadatasection in the Duo configuration page. - Copy the following information, which will be needed for the Ronspot configuration (Step 8).
Entity ID:- This is the global, unique name for Duo Single Sign-On, also known as the "Issuer".
-
Single Sign-On URL:- This is the authentication URL for Duo Single Sign-On, sometimes referred to as "SSO URL" or "Login URL".
Single Log-Out URL:- This is the logout URL for Duo Single Sign-On, sometimes referred to as "SLO URL" or "Logout Endpoint". (This field is optional.)
Certificate:- Click the
Download Certificatebutton to download a.crtfile. This certificate is used by service providers to validate the signature on the SAML response sent by Duo Single Sign-On.
- Click the
Step 5: Log in to Ronspot admin panel
- Open your web browser and go to the Ronspot admin portal.
- Enter your credentials to log in.
Step 6: Go to ‘Users > Login methods’
- In the sidebar menu, go to
Users > Login methods.
Step 7: Click on the ‘Duo’ icon
-
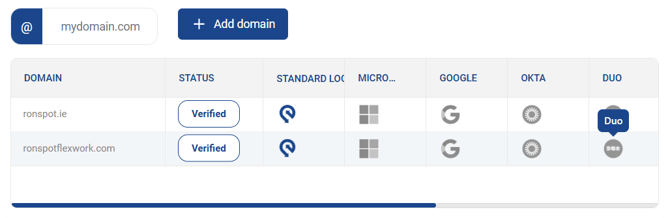
Locate your domain name in the list provided.
- If your domain name doesn’t appear in the list, click on the
Add New Domainbutton to add it.
- If your domain name doesn’t appear in the list, click on the
-
Click on the
Duologo in the Duo column next to your domain name.
Step 8: Switch to ‘Active’, paste the values, and save
-
Toggle the switch from
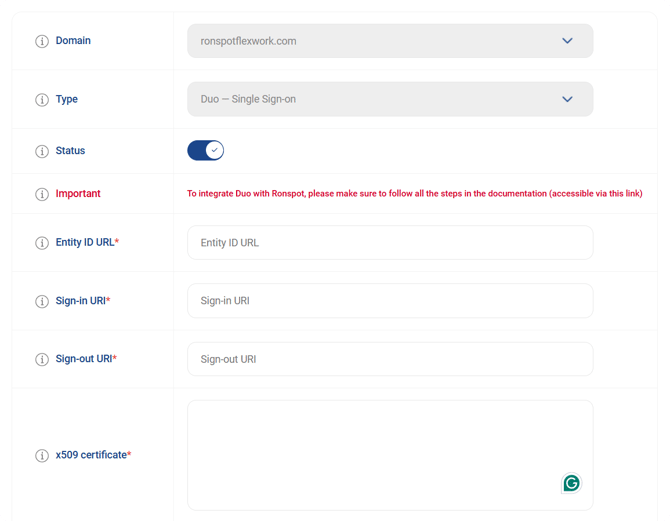
InactivetoActiveon the Status line so that it turns green. -
Paste the following values from Step 4 into the corresponding fields:
Entity ID URL: Paste the Identity Provider Issuer from Duo.Sign-in URI: Paste the Single Sign-On URL from Duo.Sign-out URI: Paste the Single Log-Out URL from Duo.X509 Certificate: Paste the certificate from the downloaded.crtfile.
Step 9: Copy the 4 URLs
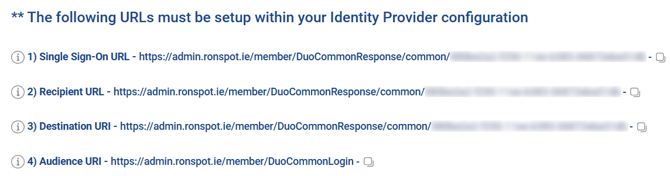
- Scroll down and copy the following four URLs, they will be needed in Step 12.
-
- Single sign-on URL
- Recipient URL
- Destination URI
- Audience URI
Step 10: Save the configuration
- Click on
Saveto finalise the configuration in Ronspot.
Step 11 - Return to the 'Application' page in your Duo admin panel
- Return to the Duo admin panel.
- Go to the
Applicationssection from the Duo dashboard.
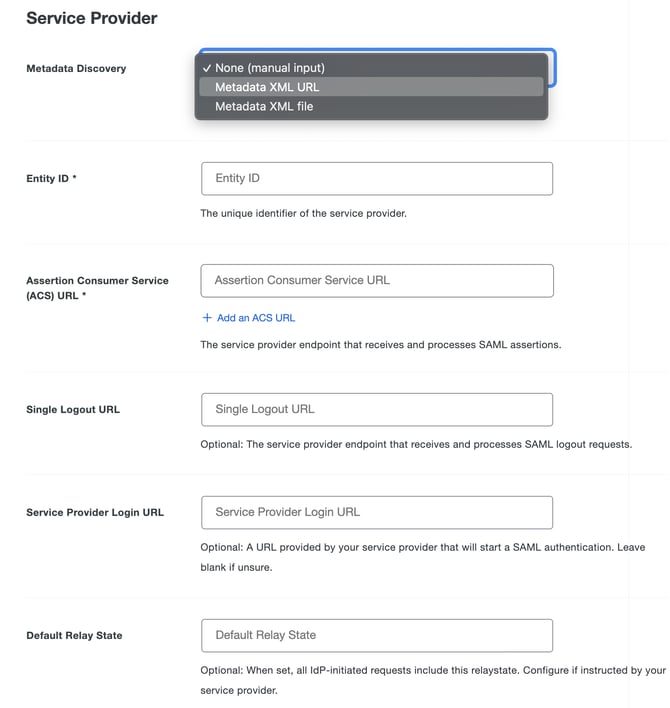
Step 12 - Step 12: How do I configure the SAML fields in the Duo Application?
Assertion Consumer Service: Paste the Single sign-on URL copied from Step 9.Single Logout URL: Paste the Recipient URL copied from Step 9.Service Provider Login URL: Paste the Destination URI copied from Step 9.Audience: Paste the Audience URI copied from Step 9.
Conclusion
You have successfully connected Duo to Ronspot, enabling secure Single Sign-On (SSO) authentication for your users. Your organisation's workforce can now access Ronspot using their existing Duo credentials.
If you encounter any issues during the setup, try the following:
- Verify that all values copied in Step 4 were pasted into the correct fields in Step 8.
- Confirm that all four URLs from Step 9 were pasted into the correct fields in Step 12.
- Consult the official Duo documentation.
- Contact Ronspot support directly for assistance.