I) Introduction
Ronspot’s integration with iPevia requires the creation of two distinct API user profiles to enable secure and efficient data exchange. The first API user allows Ronspot to update access details in the iPevia system using SOAP-based communication, ensuring that access permissions remain accurate and up to date. The second API user supports a webhook-based workflow, enabling Ronspot to receive barrier entrance logs sent by iPevia and automatically populate corresponding reports within Ronspot. Together, these API users establish a streamlined integration that enhances access management and reporting capabilities across both platforms.
II) Prerequisites
- IPevia controller: An iPevia controller is already installed and configured on-site.
- IPevia Manager account: You have an active account and subscription for iPevia.
III) Configure booking sync
Step 1: Log in to iPevia Manager
- Open your web browser and log in to your iPevia Manager account.
Step 2: Navigate to 'Software operators > Special users'
- In the navigation sidebar, go to
Software operators. - Click on
Special userson the left side of the screen.
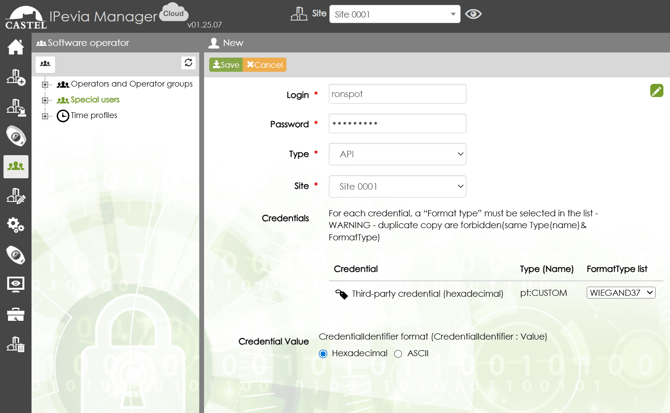
Step 3: Add a new API user
-
Click on
Add new user. -
Fill in the following fields:
- Login: Create a username for the API (e.g., "Ronspot").
- Password: Create a secure password for the API.
- Type: Choose
APIfrom the dropdown menu. - Site: Select the site you want to manage with Ronspot.
-
Configure the credentials:
- Credential: Choose
Other (hex). - Type (Name): Select
pt:CUSTOM. - FormatType list: Choose
WIEGAND37. - CredentialIdentifier:
Hexadecimal.
- Credential: Choose
-
Click
Saveto create the API user.
If the Other (Hex) option is not visible:
- Go to the iPevia Manager homepage
- Select
Site Wizard. - Under the
1. Sitesection, click onEnable/Disable Credential Types. - Then check the
Third-party credential (hexadecimal)option.
Step 4: Log in to Ronspot admin panel
- Open a new tab and log in to your Ronspot admin panel.
Step 5: Navigate to Account > Integrations
- In the admin panel, go to
Account > Integrations.
Step 6: Add a new iPevia integration
- Click on the
Add integrationbutton at the top of the screen. - In the pop-up window, select
iPevia.
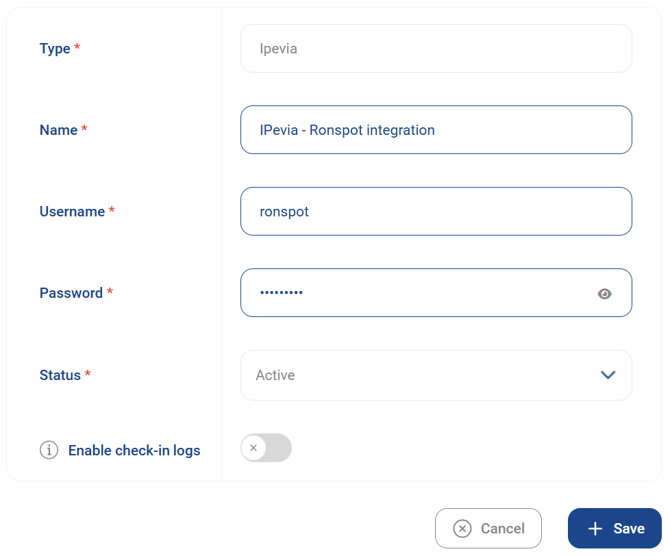
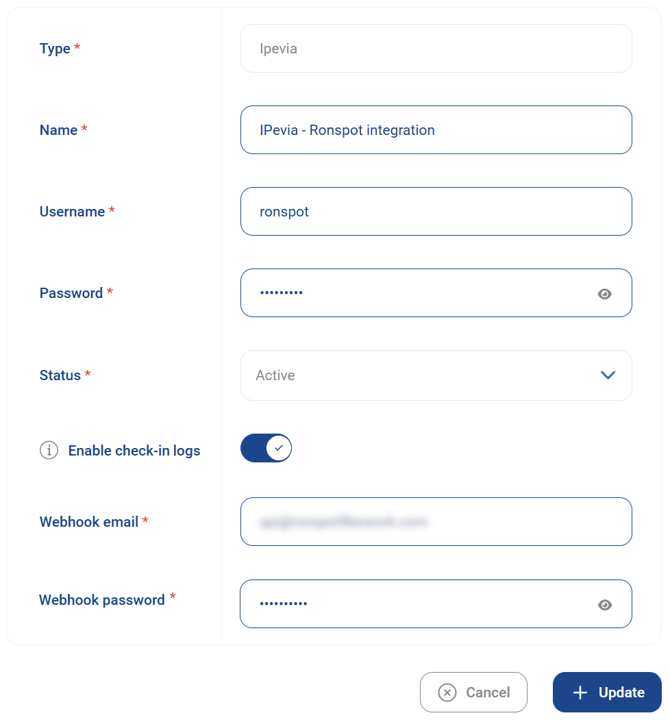
Step 7: Configure the iPevia integration
- Fill in the following fields:
- Name: Choose a name for the integration (e.g., iPevia - Ronspot integration).
- Username: Enter the same username you created in Step 3.
- Password: Enter the same password you created in Step 3.
- Status: Set the status to
Active. - Enable check-in logs: Set it to Inactive for now (this will be explained later in the in "Enable check-in logs")
- Click
Save.
Step 8: Set up the camera integration
- In the list of integrations, locate the new iPevia integration.
- Click on the camera icon in the
Actionscolumn to connect zones.

Step 9: Add an association
- Click on the
Add associationbutton at the top of the page. - Create a new association:
- Select your Ronspot zone.
- Select the site configured on iPevia Manager.
- Click
Completeto save the association. - Repeat this step to create additional associations if necessary.

Step 10: Modify your zone in Ronspot
- Navigate to the
Spaces > Zones and mapstab in the Ronspot admin panel. - Select the zone you wish to modify, and click on the zone name or pencil icon to edit it.
Step 11: Enable the 'Card access required' option
- Go to the
Advancedtab under the zone’s editing parameters. - Enable the
Card access requiredoption.

Step 12: Add card numbers for employees
- Navigate to the
Employeestab in the Ronspot admin panel. - A new column labeled
Card numberwill be visible. - Enter a card number for each employee.

Step 13: Make a booking on Ronspot
- On the Ronspot employee app, make a booking for the current day.
Step 14: Verify logs on iPevia Manager
- Log back into the iPevia Manager.
- Go to the
Toolstab in the navigation sidebar. - Click on the
Logsub-tab. - In the second column from the left (user name), verify that all actions performed by Ronspot are logged. The name you chose in Step 3 will appear here.
IV) Enable check-in logs
Step 15: Return to iPevia Manager
-
Log back into your iPevia Manager account.
Step 16: Create a new operator group
-
In the navigation sidebar, go to
Software operators > Operators and Operator groups. -
Click
Add an operator group.
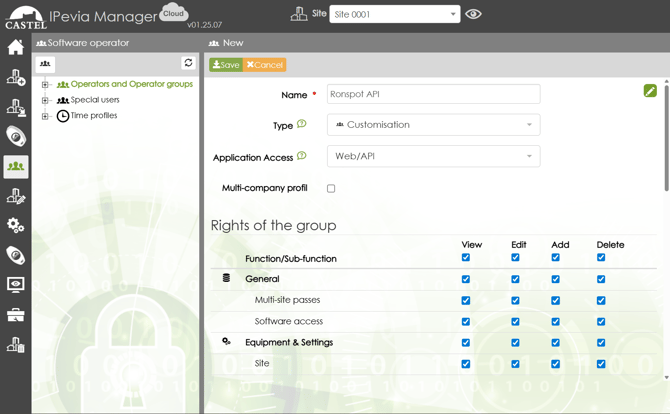
Step 17: Configure the operator group
-
Name: Assign a recognisable name to the group (e.g., Ronspot API).
-
Type: Select
Customisation. -
Application Access: Select
Web/API. -
Multi-company profile: Tick this option if your iPevia account manages access for multiple companies.
-
Rights of the group: On the first line (Function/Sub-function), enable all four options: View, Edit, Add, and Delete.
-
Click
Save.
Step 18: Create a new operator
-
After saving the group, click
Add an operatorat the top of the screen.
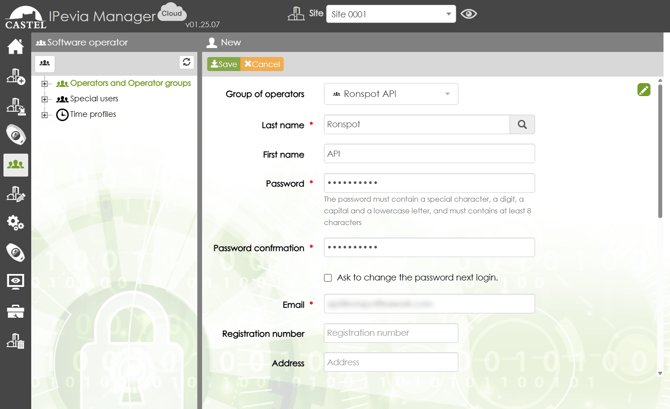
Step 19: Configure the operator
-
Group of operators: Ensure the group created in Step 17 is selected.
-
Last name: Enter a recognisable last name (e.g., Ronspot).
-
First name: Enter a recognisable first name (e.g., API).
-
Password: Enter a password and keep it safe—it will be required in Step 23.
-
Password confirmation: Re-enter the password.
-
Email: Enter an email address—this will be used when configuring the webhook in Step 23.
-
Site: Select the corresponding site
-
You may leave the remaining fields empty.
-
Click
Save.
Step 20: Return to the Ronspot admin panel
-
Log in to your Ronspot admin panel.
Step 21: Edit the existing iPevia Integration
-
Go to
Account > Integrations. -
In the list of integrations, locate the iPevia integration created in Step 7.
-
Click the pencil icon in the Actions column to edit it.
Step 22: Configure the webhook
-
Activate the Enable check-in logs toggle.
-
Two new fields will appear:
-
Webhook email: Enter the email configured in Step 19.
-
Webhook password: Enter the password created in Step 19.
-
-
Click
Update.
Step 23: Modify a zone in Ronspot
-
Go to
Spaces > Zones and maps. -
Select the zone you want to update and click the zone name or the pencil icon to edit it.
Step 24: Enable access control check-in
-
Go to the
Check-intab. -
For the Check-in type, select
Access control (IPevia). -
Click
Update.

Step 25: Apply to additional zones
-
Repeat Steps 23 and 24 for any other zones that should receive check-in logs.
-
Note: This option is only available for zones configured in Step 9.
V) Conclusion
Following these steps, your iPevia system should now be successfully integrated with Ronspot. This integration allows seamless control over site access and management by sending a whitelist of users with active bookings to the iPevia controller. It also ensures accurate check-in logs in Ronspot by using the iPevia webhook to retrieve parking entrance events from iPevia and populate the corresponding Ronspot reports.
If you have any questions, please contact support@ronspotflexwork.com.