Contents
- About the integration
- One-time setup in Azure
- One-time setup in Ronspot
- Connect a new Exchange room resource on Ronspot
- Configure the room resource on Exchange
1. About the integration
The Microsoft 365 integration allows Ronspot to securely connect to your Microsoft tenant and synchronise meetings bi-directionally using the Microsoft Graph API. This ensures that any bookings created or updated in Outlook are reflected in Ronspot, and vice-versa, through a near-instant, asynchronous sync process.
This seamless integration:
-
keeps calendars aligned
-
reduces manual adjustments
-
and ensures that meeting updates are automatically mirrored between both systems without requiring ongoing intervention
For organisations using Ronspot for workspace or parking management, this meeting sync provides accurate, real-time availability based on users’ Outlook schedules.
This integration replaces our legacy Microsoft Exchange integration and addresses two limitations:
-
Delayed email delivery of calendar invites, which could take up to two minutes and increases the potential of double-bookings of the same time period.
-
Exchange’s restriction on editing meetings, caused by the absence of the unique meeting ID when an organiser updates a meeting from Outlook.
Before setting up the integration, please ensure you, or an experienced individual in your organisation, has access to the Azure portal.
If employees are not familiar with reserving (Exchange) room resources in Outlook meeting then they can use How to use Ronspot meetings rooms with Outlook.
2. One-time setup in Azure
Note: this is usually done by an experienced information technology professional.
Step 1: Log in to the Azure portal
-
Open your web browser and navigate to the Azure portal.
-
Enter your credentials to log in.
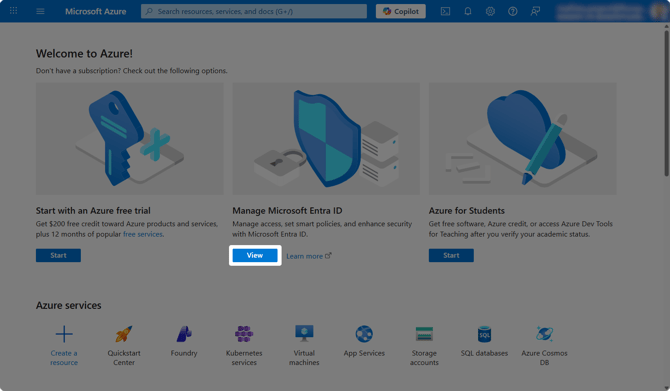
Step 2: Go to ‘Manage Microsoft Entra ID’
-
In the Azure homepage, locate the Manage Microsoft Entra ID section.
-
Click on the
Viewbutton under Manage Microsoft Entra ID.
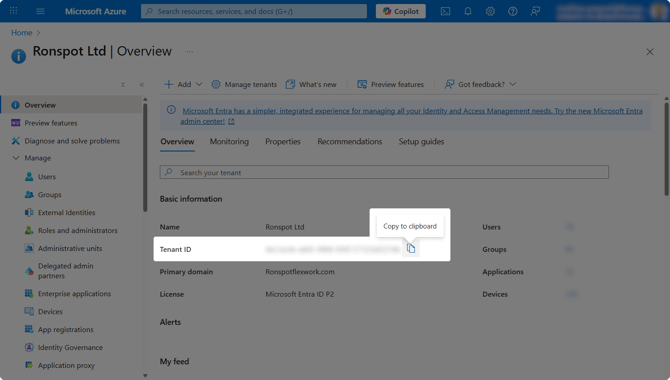
Step 3: Copy the Tenant ID
- Ensure that you are on the Overview panel in the left navigation.
-
Your Tenant ID appears under Basic information.
-
Click the
Copy to clipboardicon and paste the Tenant ID into a notepad
You will need this Tenant ID later in Step 14.
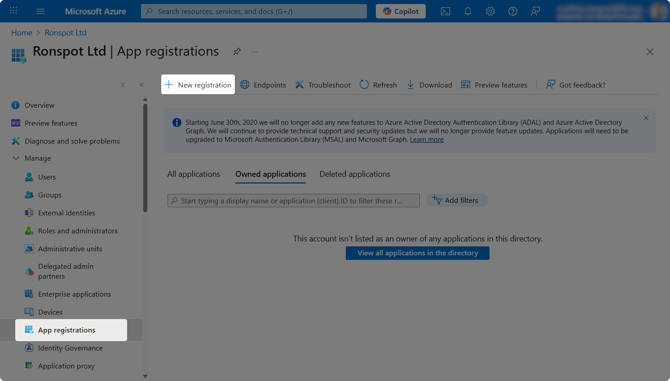
Step 4: Create a new 'App registrations’
-
In the left-hand sidebar, click on
App registrations. -
At the top of the page, click on the
+ New registrationbutton.
Step 5: Register a new application
-
Configure the following fields:
-
Name: This is the name of the application (e.g. Microsoft 365 - Ronspot sync)
-
Supported account types: Choose who can access the API (Default: Accounts in this organizational directory only)
-
Redirect URI (optional): Select Web and add this URL:
-
-
Click
Register

Step 6: Set app permissions
- In the left navigation, under
Manage, clickAPI Permissions. - Click the
Add a permissionbutton to add the following permissions:-
API / Permissions name Type Admin consent required Calendars.Read Delegated No Calendars.ReadWrite Application Yes offline_access Delegated No User.Read Delegated No
-
- Then click on
Grant admin consent for Ronspot Ltd(after permissions are added)

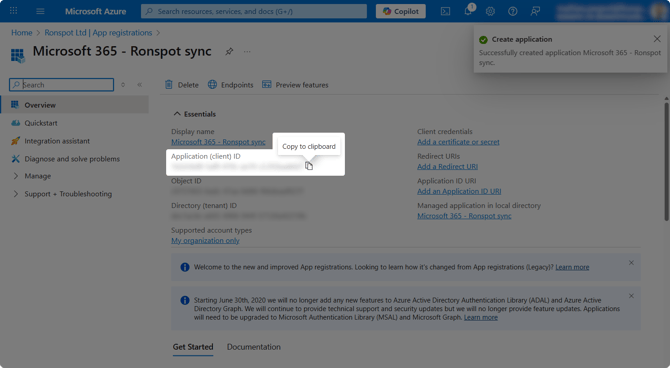
Step 7: Copy the ‘Application (client) ID’
-
Return to the Overview page for the new app.
-
Under Essentials, locate the Application (client) ID.
-
Click the
Copy to clipboardicon and paste the Client ID into a notepad.
You will need this Client ID later in Step 14.
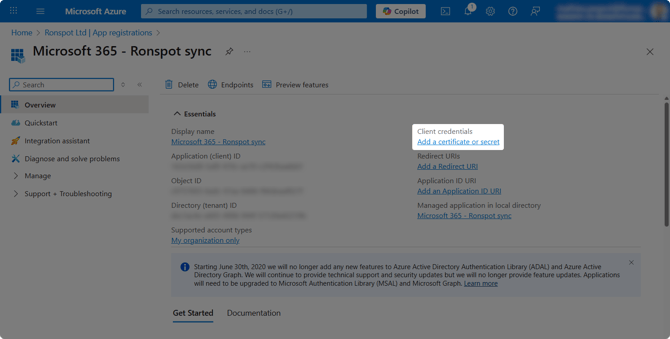
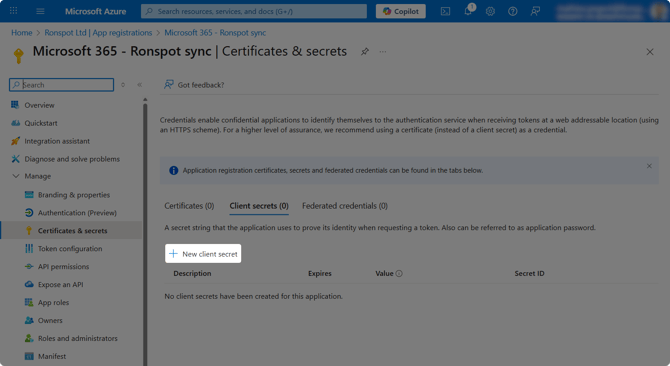
Step 8: Generate client credentials
-
Still under Essentials, locate the Client credentials section.
-
Click
Add a certificate or secret. -
On the next page, select
+ New client secret
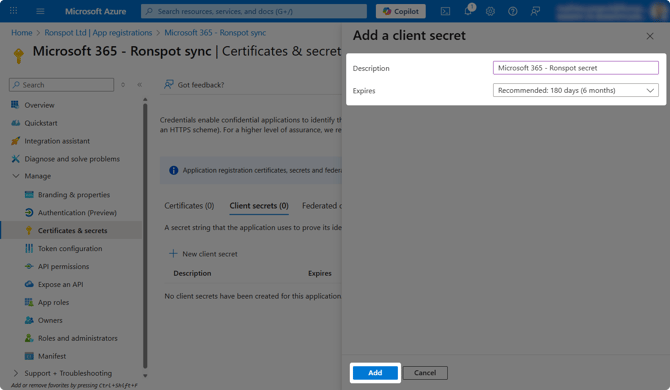
Step 9: Add a client secret
-
Description: Enter a name for the client secret (e.g. Microsoft 365 - Ronspot secret)
-
Expires: Choose the maximum permissible expiration period for your organisation.
-
Click
Add
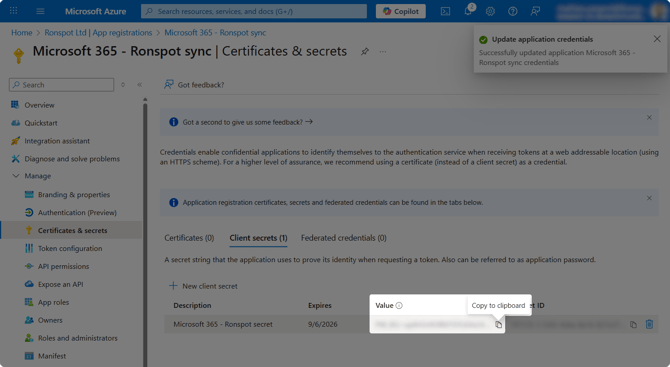
Step 10: Copy the client secret ‘Value’
-
Once the panel closes, your new client secret will appear in a table.
-
In the Value column, click the
Copy to clipboardicon and paste the Client secret value into a notepad. - Rotating secrets
- Secrets will expire as per selection shown in screenshot above, the maximum validity period is two years.
- The customer needs to manage the rotation of secrets, there is no automated mechanism provided.
- Manually, you can create a new secret in Azure, as just shown above. Set the new secret value in Ronspot Integration settings for Microsoft 365, then after 48 hours the old secret can be removed from Azure (for security).
You will need this Client secret value later in Step 14.
3. One-time setup in Ronspot
Prerequisite: the Tenant ID, Client ID and the secret key from the above section.
Step 11: Log in to the Ronspot admin portal
-
Open your web browser and navigate to the Ronspot admin portal.
-
Enter your credentials to log in.
Step 12: Navigate to Account > Integrations
-
Go to
Account > Integrations
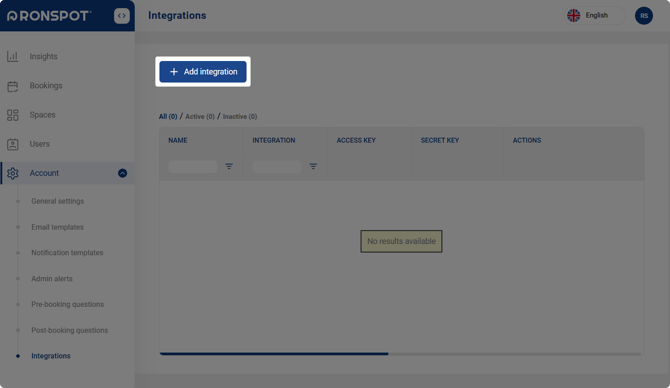
Step 13: Add a new integration
-
Click on the
+ Add integrationbutton at the top of the screen. -
In the pop-up window, select Microsoft 365.
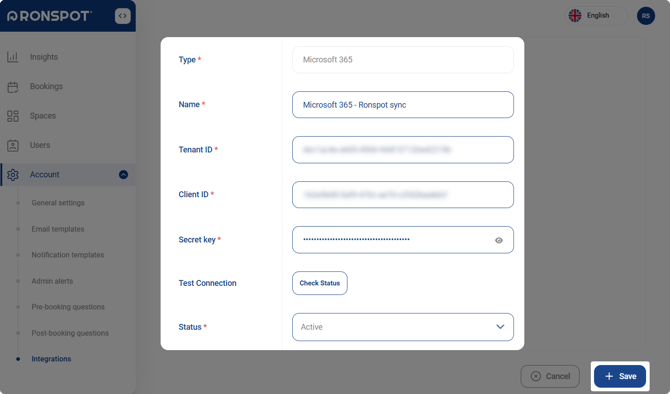
Step 14: Configure the Microsoft 365 integration
-
On the configuration screen, enter the following details:
-
Name: Enter a recognisable name for the integration (e.g., “Microsoft 365 - Ronspot sync”)
-
Tenant ID: Paste the Tenant ID from Step 3
-
Client ID: Paste the Application (client) ID from Step 7
-
Secret key: Paste the Client secret ‘Value’from Step 10
-
Test Connection: Click on
Check Statusto confirm that the connection is working -
Status: Set this to Active
-
-
Press
Save
4. Connect the Exchange room resource on Ronspot
Follow the steps below to connect a Ronspot room to an Exchange room resource.
Notes
- After the steps in the previous section have been completed, you must create a new Ronspot room to connect it to the new integration.
- To convert an existing Ronspot room that is already connected to an Exchange room resource (using the legacy integration) to use the new integration, you must to the following:
- Remove (cut to clipboard) the email address in the "External bookings via email" edit box.
- Enter (paste from clipboard) the same email address it into the "Microsoft 365 – Room mailbox" edit box.
- Click the
+ Updatebutton. - It will take a short amount of time for the Ronspot service to synchronise existing meetings from Exchange to Ronspot.
- When a new email address is entered into the "Microsoft 365 – Room mailbox" and the
+ Updatebutton is clicked, all the existing meetings in the Ronspot room are removed permanently - this is to allow accurate synchronisation of meetings from Exchange to Ronspot. - There are some small differences between the two systems e.g. the "Biweekly" meeting recurrence option in a Ronspot room is not available when it is connected to the new integration, because it is not supported in Outlook/Exchange.
Step 15: Navigate to Spaces > Meeting Rooms
-
Go to
Spaces > Meeting room.
Step 16: Edit a meeting room
- Find your room in the list, then click the room name (or the pencil icon) to edit it.
- If the room isn’t listed, click
+ Add meeting room, then edit the new room.
Step 17: Add the room mailbox
- In the field Microsoft 365 – Room mailbox, enter the email address of the corresponding Exchange room resource
- Click on the
+ Updatebutton.- Any meetings for the room on the Ronspot account are cleared/removed cancellations will not be sent).
- Meetings for the connected room are synced only from the Exchange side to Ronspot (Exchange is the single source of truth).

Step 18: Repeat for other meeting rooms
- Repeat steps 16 and 17 for any other meeting rooms you want to sync using Microsoft 365.
5. Configure the room resource on Exchange
a. Setting up a new room resource on Exchange
Follow these steps to set up a new Exchange room resource in the Exchange admin center.
-
Navigate to Exchange admin center, this requires the appropriate Microsoft 365 administrator permissions.
- In the menu on the left, under
Recipients, clickResources. - Click
Add a room resourcebutton, a New resource mailbox popup appears. - In Name, enter a friendly name that colleagues will see in Outlook, the same name should be in the Ronspot meeting room configuration.
- In Resource email address, use a name similar to above but without spaces and then choose the domain that is associated with your Ronspot company account. This is the email address that should be used in step 17 in the previous section.
- Click
Next. - In the Set properties step Capacity and Country/Region should be set and match the settings to be used in the Ronspot meeting room. Click
Next. - In the Booking options step, set the following:
- Ensure that Allow repeating meetings is checked on.
- Set Allow scheduling only during work hours depending on the hours you have set or plan to set in the corresponding Ronspot meeting room.
- Ensure that Automatically decline meetings outside of booking limits below is checked on.
- Set Booking window (days) to 365 or to the same number as set up in the Ronspot meeting room.
- Set Maximum duration (hours) to the same number of hours set, or plan to set, in the corresponding Ronspot meeting room.
- Ensure that Automatically accept/decline meeting requests is checked on.
- Click
Next.
- Review the settings before clicking
Create.
An Exchange resource has a hidden property, AllowConflicts, which may be enabled on older rooms. It must be set to false for the Ronspot integration to work correctly; new Exchange room resources already use this setting.
b. Editing an existing room resource on Exchange
Follow these steps to configure an existing Exchange room resource for use with a Ronspot meeting room.
-
Navigate to Exchange admin center, this requires the appropriate Microsoft 365 administrator permissions.
- In the menu on the left, under
Recipients, clickResources. - Click on the Display name of a room line item, a popup to the right will appear.
- The General tab contains the email address associated with the room resource, this email address needs to the used in the corresponding Ronspot meeting room.
- To change any of the details on this tab, click the
Manage resource detailslink. Ensure that the Capacity value matches the value used in the Ronspot room. - Click the Booking tab.
- Click the
Manage delegate settingslink on the right:
- Ensure that Automatically accept/decline meeting requests is selected.
- Click the
←button.
- Click the
Manage booking settingslink on the right:- Ensure that Allow repeating meetings is checked on.
- Set Allow scheduling only during work hours depending on the hours you have set or plan to set in the corresponding Ronspot meeting room.
- Ensure that Automatically decline meetings outside of booking limits below is checked on.
- Set Booking window (days) to 365 or to the same number as set up in the Ronspot meeting room.
- Set Maximum duration (hours) to the same number of hours set, or plan to set, in the corresponding Ronspot meeting room.
- Click the
←button.
- Click
Saveif you have changed any of the room settings.
Congratulations, you have set up the integration successfully!
If you need further help, please reach out at support@ronspotflexwork.com