Step 1: Log in to the Ronspot admin panel
- Open your web browser and navigate to the Ronspot admin portal.
- Enter your credentials to log in.
Step 2: Go to ‘Users > Login Methods’
-
In the sidebar menu, click on
Account. -
Select
Login methodsfrom the submenu.
Step 3: Click on the ‘Okta’ icon

-
Find your domain name in the list displayed.
- If your domain name doesn’t appear in the list, click on the
Add domainbutton to add it.
- If your domain name doesn’t appear in the list, click on the
-
Then click on the
Oktalogo in the Okta column next to your domain name.
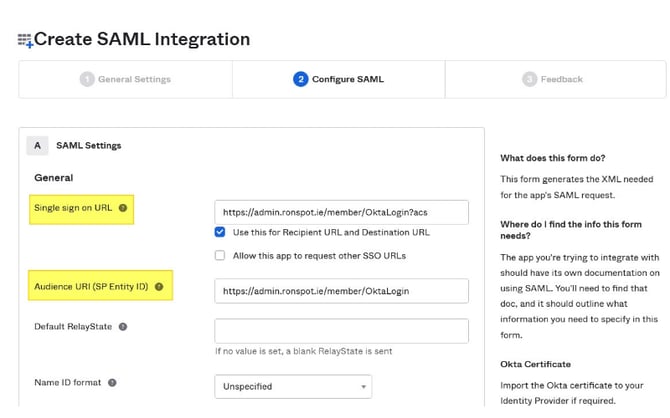
Step 4: Copy the 4 URLs
Scroll down to view and copy the following four URLs:
- Single sign-on URL
- Recipient URL
- Destination URI
- Audience URI
These URLs are specific to your Ronspot account and will be required in Step 10.

Step 5: Login to Okta
- Navigate to the Okta website.
- Enter your company credentials to log in.
Step 6: Go to ‘Applications’ → ‘Applications’
-
In the Okta dashboard, click on
Applicationsin the sidebar menu. -
This will expand to show another
Applicationsoption. Click on it.

Step 7: Select ‘Create app integration’
- To create a new application, click on the
Create app integrationbutton.
Step 8: Choose ‘SAML 2.0’
-
For the Sign-in method, select
SAML 2.0. -
Set the Application Type to
Web application. -
Click on
Nextto proceed.

Step 9: Complete the ‘General settings’ Section
-
App name: Enter Ronspot. -
Logo: (Optional) Upload the Ronspot logo if desired. -
Click on
Nextto continue.

Step 10: Paste the Values from Step 4
-
Single sign-on URL: Paste the Single sign-on URL copied from Step 4. -
Audience URI (SP Entity ID): Paste the Recipient URL. -
Destination URL: Paste the Destination URI. -
Audience restriction: Paste the Audience URI. -
Click on
Nextto proceed.
Step 11: Complete the ‘Feedback’ section
-
Are you a customer or partner?: Select I’m an Okta customer adding an internal app. -
App type: Choose This is an internal app that we have created. -
Click on
Finish.

Step 12: Go to ‘Assignments’ and select employees
-
In the
Assignmentstab, select the employees you want to give access to Ronspot via Okta. -
You can choose to grant access to all members of your organization or restrict it to specific users.

Step 13: Go to ‘Sign On’ section and click on ‘View Setup Instructions’
-
Scroll down to the
Sign Ontab. -
Click on
View setup instructions.
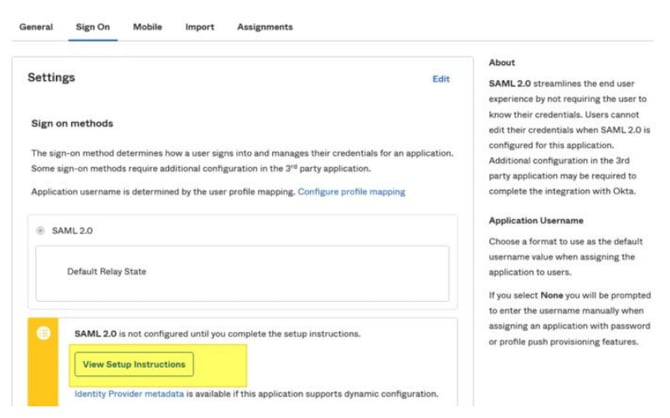
Step 14: Copy the values for step 18
-
A page will open displaying the following values:
Identity Provider Single Sign-On URLIdentity Provider IssuerX.509 Certificate
-
Copy these values as they will be needed in Step 18.

Step 15: Add 3 attributes for First Name, Last Name and Email Address
-
In the Attributes section the following 3 attributes required to be added
First Name user.firstName Last Name user.lastName Email Address user.email - The following Attributes are optional
ID user.id Department user.department City user.city
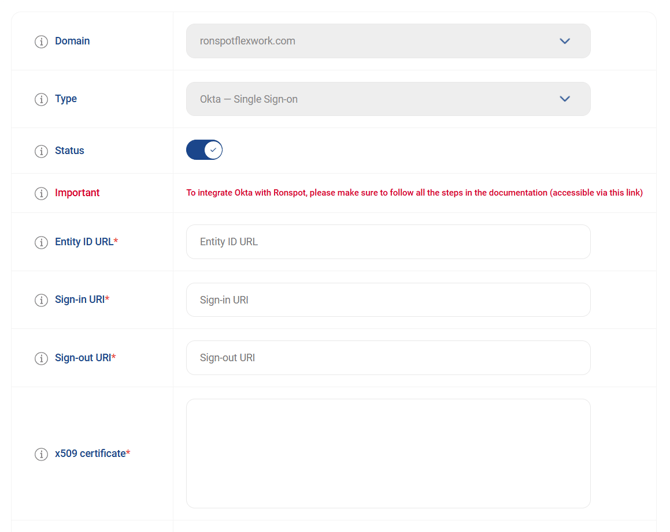
Step 16: Go back to ‘Login methods’ in the Ronspot admin panel
-
Return to the Ronspot admin portal.
-
In the sidebar menu, click on
Usersand selectLogin methods.
Step 17: Click on the ‘Okta’ Icon
-
Find your domain name in the list
-
Then click on the Okta logo in the Okta column.
Step 18: Switch to ‘Active’, paste the values (from step 14) and save
-
Toggle the switch from
InactivetoActiveon the Status line so that it turns green. -
Paste the following values from Step 14 into the corresponding fields:
Entity ID URL: Paste the Identity Provider Issuer.Sign-in URI: Paste the Identity Provider Single Sign-On URL.Sign-out URI:Paste the Identity Provider Single Sign-On URL.X509 certificate: Paste the X.509 Certificate.
-
Click on
Saveto finalize the configuration.
Conclusion
You have successfully connected Okta to Ronspot, enabling seamless user authentication through Okta's SSO functionality. This integration will enhance security and simplify user management for your organization.
Property mapping: If you wish to map Microsoft Identity Property to Ronspot Property, please refer to this article.
If you encounter any issues, please refer to the documentation provided by Okta and Ronspot, or contact their support teams for further assistance.