Table of contents
3. Create access to the Ronspot REST API
1. Introduction
Our REST API provides a real-time access-control decision service that enables barriers, gates, or controlled entry points to validate whether a vehicle or cardholder is authorised to enter a car park. In this architecture, the access-control system always acts as the initiating system. When a vehicle registration or card number is presented at a lane, the controller sends a live request to the Ronspot REST API. Ronspot then evaluates the request against current booking data, user permissions and space availability, and returns an immediate authorisation decision.
The endpoints described in this documentation allow the access-control system to submit registration or card-access queries and receive structured responses that determine whether access should be granted. This ensures seamless integration between the physical access equipment and Ronspot’s booking management platform.
2. Prerequisites
Before setting up the integration, ensure you have:
-
An IT technician who can configure API calls to the Ronspot REST API for booking validation.
3. Create access to the Ronspot REST API
Step 1: Log in to Ronspot admin panel
- Sign in to your Ronspot admin panel using your administrator credentials.
Step 2: Navigate to Account > Integrations
- In the left-hand menu, go to
Account > Integrations
Step 3: Add a new integration
- Click
Add integrationbutton at the top of the page. - In the pop-up window, choose
Ronspot REST APIas the integration type.
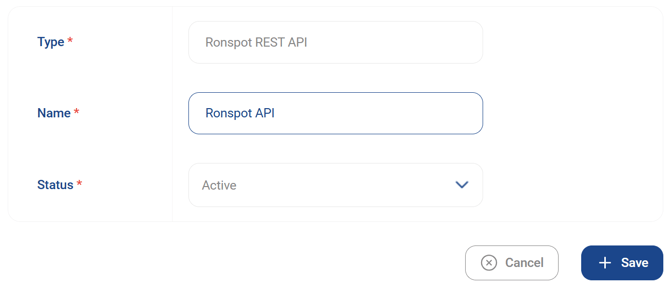
Step 4: Configure the Ronspot REST API integration
- You will be prompted to provide the following:
- Name : Enter a name for the integration (e.g., Ronspot API)
- Status: Set to Active
- Press
Save
Step 5: Associate your Ronspot zones
Next, you will specify which Ronspot zones should use the Ronspot REST API.
- In the list of integrations, find your newly created Ronspot REST API.
- Click the camera icon in the
Actionscolumn to manage zone associations.

Step 6: Add an association
- Click the
Add associationbutton at the top of the page. - Select the Ronspot zone you want to link.
- Click
Completeto save the association. - Repeat this process to add more zone associations as needed.

Step 7: Copy the API access key
-
Go back to the integrations list.
-
Locate the REST API integration.
-
Click the clipboard icon in the
Actionscolumn to copy your API access key.

Step 8: Make API calls to the Ronspot REST API
Share the information below with your IT team so they can configure their system to call Ronspot’s validation endpoints.
4. Authorisation
- Select “Basic Auth” as the authentication method.
- To obtain your credentials, please contact your designated Ronspot representative, who will provide you with the required username and password.
5. Endpoint: Registration access
Used to validate access based on vehicle registration number.
- Method: POST
- URL:
-
https://newapi.ronspot.ie/registration_access
-
- Headers
-
Content-Type: application/json
apikey: Your API key
-
- Parameters
-
apikey (required): Your API key
-
parkingID (required): The ID of the parking facility. Use 100 for testing purposes. For live use, select the correct ZoneID for the relevant car park. You can find the ZoneID in the Admin Panel by navigating to Spaces → Zones & Maps. Locate the appropriate parking zone and note its ZoneID. If the ZoneID column is not visible, right-click on the table header and enable it by selecting the ZoneID checkbox.
-
registration (required): Vehicle registration number
-
lane (required): "entry" or "exit"
-
time (optional): Timestamp; if omitted, the server applies the current time
-
- Example of JSON request:
-
{
   "apikey":"288d4022d050f98bc4320264d1b3f371",
   "parkingID":"100",
   "registration": "EQY123",
   "lane":"entry",
   "time":""
}
-
- Example of JSON response:
-
{
  "registration_access": {
      "registration": "EQY123"
  },
  "time": 1703245186,
  "lane": "entry",
  "result": {
     "know": true,        // The car registration exists in the Ronspot database
     "allowed": false,    // The employee currently has no active booking
     "name": "John Doe",  // The employee’s name associated with the registration
     "space_number": null // No space number because there is no active booking
  }
}
-
6. Endpoint: Swipe card access
Used to validate parking access based on an employee’s swipe card number.
- Method: POST
- URL:
-
https://newapi.ronspot.ie/card_access
-
- Headers
-
Content-Type: application/json
apikey: Your API key
-
- Parameters
- apikey (required): Your API key
- parkingID (required): The ID of the parking facility. Use 100 for testing purposes. For live use, select the correct ZoneID for the relevant car park. You can find the ZoneID in the Admin Panel by navigating to Spaces → Zones & Maps. Locate the appropriate parking zone and note its ZoneID. If the ZoneID column is not visible, right-click on the table header and enable it by selecting the ZoneID checkbox.
- card (required): Cardholder’s alphanumeric swipe card number
- lane (required): "entry" or "exit"
- time (optional): Timestamp; if omitted, the server applies the current time
- Example of JSON request :
-
{
  "apikey":"288d4022d050f98bc4320264d1b3f371",
  "parkingID":"100",
  "card": "ABCD12345",
  "lane":"entry",
  "time":""
}
-
- Example of JSON response:
-
{
  "card_access": {
      "card": "ABCD12345"
  },
  "time": 1703245186,
  "lane": "entry",
  "result": {
      "know": true,        // The car registration exists in the Ronspot database
      "allowed": false,    // The employee currently has no active booking
      "name": "Jane Doe",  // The employee’s name associated with the card
      "space_number": null // No space number because there is no active booking
  }
}
-
If you need further help, please reach out at support@ronspotflexwork.com