Requirements & Important Notes
-
App version requirement
-
Wi-Fi check-in is only supported on the Ronspot mobile app (Android or iOS), version 13.0.0 or later.
-
-
Employee app permissions: Employees must explicitly grant permission to allow Wi-Fi-based check-ins:
- To do this, they should: go to the
Profiletab and toggle theAllow check-in with Wi-Fiswitch to enable the feature
- To do this, they should: go to the
-
Location permissions and data handling
-
Ronspot collects Wi-Fi network name (SSID) and identifier (BSSID) to determine proximity to the booked space.
-
Precise location permission is required by the app to access Wi-Fi data.
-
This information is used only at check-in time and immediately discarded after check-in.
-
Ronspot does not collect or store your exact GPS coordinates.
-
- Background service
- Wi-Fi-based check-in works even when the app is not open, as long as location permission is granted and the app runs in the background.
Step 1: Go to ‘Account > Integrations'
- Open your web browser and navigate to the Ronspot admin portal.
-
In the sidebar menu, go to
Account > Integrations.
Step 2: Add a new Wi-Fi integration
-
Click
Add Integration -
Select
Wi-Fias the integration type.
Step 3: Name the Wi-Fi integration
-
Give your integration a recognisable name (e.g. "Floor 2 Wi-Fi").
-
Click
Save.

Step 4: Select 'Connect zones'
-
In the Actions column for the Wi-Fi integration, click the Connect zones icon (second icon).

Step 5: Add a new Wi-Fi mapping
-
Click the
Add Wi-Fi mappingbutton
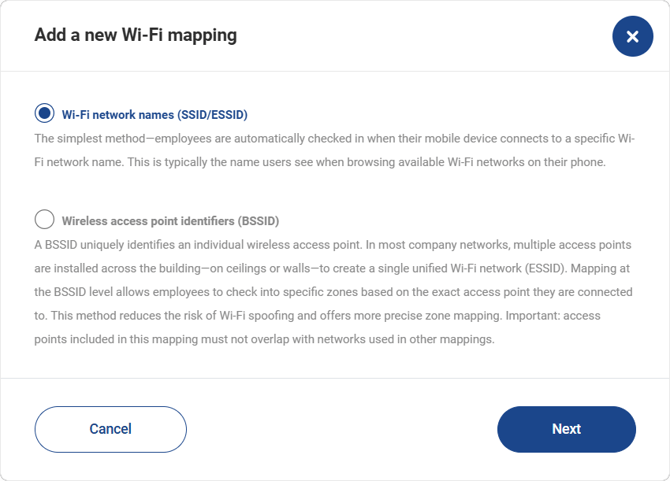
Step 6: Define the mapping type
-
Choose what you want to map:
-
Wi-Fi network names (SSID):
-
SSID is the name you see when scanning for Wi-Fi networks on your device (e.g.,
Ronspot-Wifi-5G).
-
-
or Wireless access point identifiers (BSSID):
-
BSSID is the unique identifier for a specific router or access point (e.g. a MAC address like
34:22:64:11:AC:9F).
-
-
Step 7A: Configure the mapping (for SSID)
-
Enter a Mapping name (for internal reference).
-
Select one or more Zones to associate with this mapping.
-
Enter the SSID value.
-
Optionally, click "Add another Wi-Fi network" if needed.
-
Click
Apply.

Step 7B: Configure the mapping (for BSSID)
-
Enter a Mapping name (for internal reference).
-
Select one or more Zones to associate with this mapping.
-
Enter the BSSID value.
-
Optionally, click "Add another BSSID" if needed.
-
Click
Apply.

Notes:
- Each SSID or BSSID can only belong to one mapping
- You may add multiple mappings for different zones or access points (repeat steps 5 to 7)
Step 8: Go to ‘Spaces > Zones and maps'
- Navigate to Spaces > Zones and maps in the Admin Panel.
Step 9: Edit a zone
- Click on the zone you wish to update.
Step 10: Enable Wi-Fi check-in
- Go to the
Check-intab. -
In the Check-in Type dropdown, select
Wi-Fi. -
Click
Updateto apply the changes.

Notes:
- If you selected multiple zones for your mapping, make sure to individually edit each of these zones and repeat steps 9 and 10 for each one.
That's it! We recommend testing the setup with a few pilot users to ensure your SSID/BSSID mappings are correctly configured. If you need further assistance, please contact Ronspot Support.