Table of contents
1. Introduction
There are 4 ways for employees to join your Ronspot account:
- Individual user addition: Administrators can add employees individually through the admin panel.
- Bulk import: Administrators can import multiple employees at once using a CSV file.
- Single Sign-On (SSO): If Single Sign-On is connected, employees can log in directly without the need to register.
- Self-registration: Employees can manually register using their company email address. Their accounts will need to be verified, either by the administrator or through email confirmation by the employee.
Step 1: Navigate to 'Employees'
- Log in to the Ronspot admin panel.
- Navigate to
Users > Employees.
Step 2: Click 'Add Employee'
- Click on the
Add Employeebutton in the top right corner.
Step 3: Fill in the following fields
Email: Enter the employee’s email address.First Name: Enter the employee’s first name.Last Name: Enter the employee’s last name.Password: Choose a password or click on the Generate button to automatically generate one.Group(Optional): The employee will automatically inherit the settings from this group.Default Zone(Optional): This zone will be selected by default in the employee’s account.Notify employee by email: Tick this option to send the employee an email with their account details.
- Click on
Addto finalise the process.

3. Bulk import of employees
Step 1: Navigate to 'Employees'
- Log in to the Ronspot admin panel.
- Navigate to
Users > Employees.
Step 2: Click 'Import employees'
- Click on the
Import employeesbutton in the top right corner.
Step 3: Configure the following fields
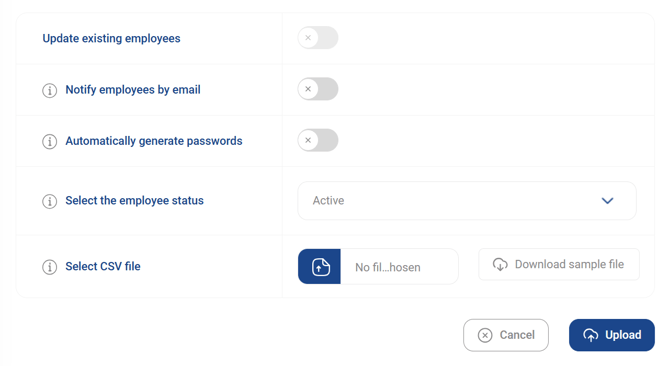
Notify employee by email:- Yes: Imported employees will automatically receive an email notification that an account has been created for them.
- No: Imported employees won’t receive any email notification about the import.
Automatically generate passwords:- Yes: A random password will be automatically created and sent to the imported employees.
- No: No password will be automatically generated (you can set a password manually in the CSV file).
Select the employee status:- Active: Imported employees will be able to log in immediately after the import.
- Inactive: Imported employees won’t be able to log in until their account is manually activated.
Step 4: Create your CSV file
- Click on the link
Download sample fileto create your CSV file.
Notes:
Ensure that the column names in the header/first row match the names below.- Column A:
FirstName - Column B:
LastName - Column C:
Email - Column D:
Password(optional—leave blank if not needed; if “Automatically Generate Passwords” is selected, this column will be ignored) - Column E:
CarPlate(optional—leave blank if not needed; type the vehicle registration plate, use commas to add more than one) - Column F:
GroupName(optional—leave blank if not needed; type the name of an existing group to automatically add this employee to the group) - Column G:
TeamName(optional—leave blank if not needed; type the name of an existing team to automatically add this employee to the team) - Column H:
TeamLeader(optional—leave blank if not needed; type the name of an existing team to make this employee a leader of this team) - Column I:
DefaultZone(optional—leave blank if not needed; type the name of an existing zone to display this zone by default on the employee’s account)
Step 5: Upload your CSV file
- Click on
Choose fileand select your CSV file. - Click on the
Uploadbutton.
Step 6: Confirm the import
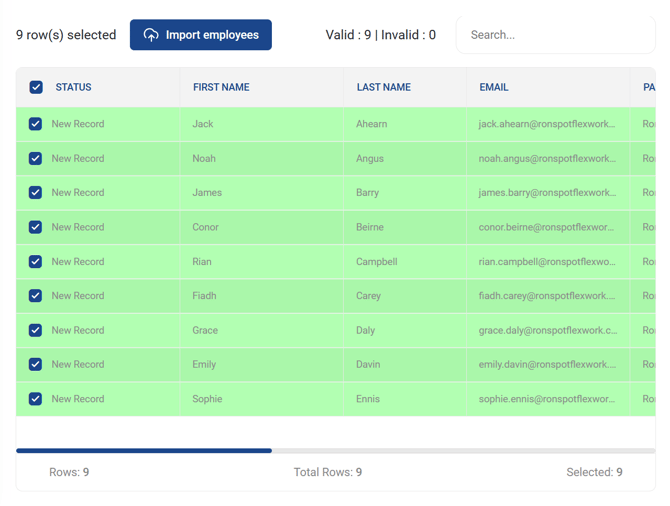
The next page is a preview page that evaluates each row and value in your CSV file. No employees have been imported into the Ronspot System at this point.
- Green rows: Valid values. These rows are selected by default and will be imported when you click the Import Employees button at the top of the grid.
- Red rows: An error message will appear in the Status column, indicating what was invalid and why. These rows cannot be selected and will not be imported.
Click on the Import employees button to confirm.
If you have invalid rows, decide whether to:
- Go back and edit your CSV file and re-attempt the full upload.
- Proceed and import the currently selected rows, then add the remaining rows in a separate CSV file or one by one.
Step 7: Monitor import progress
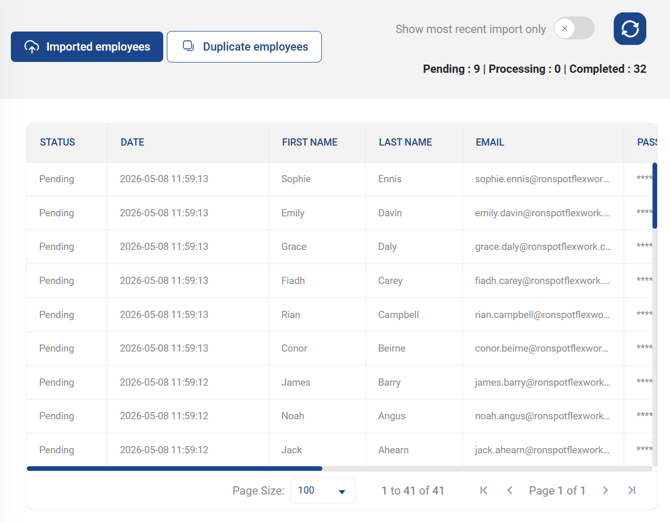
- Importing employees may take some time.
- Feel free to leave the page and refresh it to monitor the progress. You can access it from the
Users > Employeespage by clicking theUpload employeesbutton, and then theImport statusbutton.
4. Adding a new administrator
Step 1: Navigate to 'Administrators'
- Log in to the Ronspot admin panel.
- Navigate to
Users > Administrators.
Step 2: Click the 'Add' icon
- Click on the yellow
+icon in the top right corner.
Step 3: Complete the following fields:
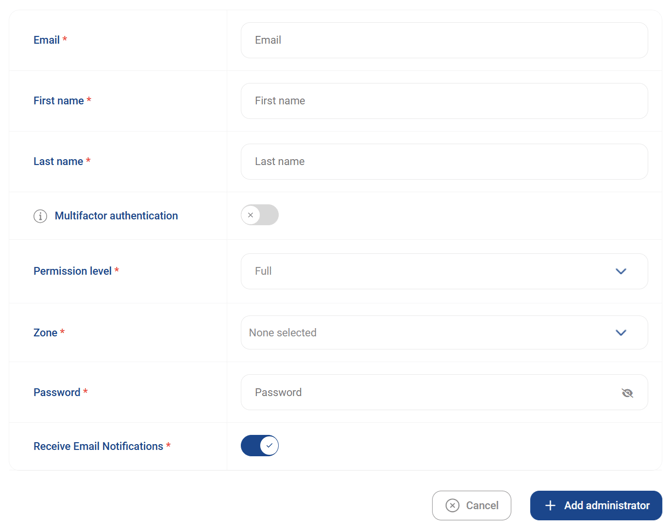
Email: Enter the administrator’s email address.First Name: Enter the administrator’s first name.Last Name: Enter the administrator’s last name.Multi-Factor Authentication (MFA):- Yes (recommended): An email will be automatically sent to the administrator after entering credentials. Clicking on the link grants access to the admin panel.
- No: The administrator can log in directly after entering their credentials.
What is Multi-Factor Authentication? MFA serves as an additional layer of security for the Ronspot admin panel. This feature enhances security measures by requiring administrators to receive an email notification every time they log in. To confirm their identity and gain access to the admin panel, administrators must click the provided link.
Permission Level:- Full: Access to all tabs in the sidebar menu.
- Basic: Limited access to booking data and analytics (view only, no editing permissions). See breakdown below.
Zone: Select the zones you want to give the administrator access to.- Note: When an administrator creates a new zone, this particular administrator will automatically receive default access to it. Other administrators’ profiles will have to be updated manually.
Password: Must be at least 10 characters long and contain at least one number, one uppercase letter, one lowercase letter, and one special character.Send email alert for new user registrations: Tick the box if you wish to inform this administrator of any new users joining the system.- Click the
Addbutton.
Administrator permissions breakdown:
|
Menu |
Basic |
Full |
|---|---|---|
|
Insights |
✅ |
✅ |
|
Live view |
✅ |
✅ |
|
Edit |
🔲 |
✅ |
|
Dashboard |
✅ |
✅ |
|
Reports |
✅ |
✅ |
|
Bookings |
✅ |
✅ |
|
Space bookings |
✅ |
✅ |
|
Edit |
🔲 |
✅ |
|
Room bookings |
✅ |
✅ |
|
Edit |
🔲 |
✅ |
|
Scheduler |
🔲 |
✅ |
|
Closing dates |
🔲 |
✅ |
|
Spaces |
🔲 |
✅ |
|
Zones and maps |
🔲 |
✅ |
|
Parking spaces |
🔲 |
✅ |
|
Desks |
🔲 |
✅ |
|
Meeting rooms |
🔲 |
✅ |
|
Users |
🔲 |
✅ |
|
Employees |
🔲 |
✅ |
|
Administrators |
🔲 |
✅ |
|
Login methods |
🔲 |
✅ |
|
Groups settings |
🔲 |
✅ |
|
Teams permissions |
🔲 |
✅ |
|
Emergency roles |
🔲 |
✅ |
|
Account |
🔲 |
✅ |
|
General settings |
🔲 |
✅ |
|
Email templates |
🔲 |
✅ |
|
Notification templates |
🔲 |
✅ |
|
Admin alerts |
🔲 |
✅ |
|
Pre-booking questions |
🔲 |
✅ |
|
Post-booking questions |
🔲 |
✅ |
|
Integrations |
🔲 |
✅ |
|
Top right menu |
✅ |
✅ |
|
My profile |
🔲 |
✅ |
|
Getting started |
🔲 |
✅ |
|
Licences |
✅ |
✅ |
|
Delete account |
🔲 |
✅ |
|
New features |
🔲 |
✅ |
|
Help centre |
🔲 |
✅ |
|
Contact us |
🔲 |
✅ |
This guide provides a comprehensive walkthrough of adding new users to Ronspot, whether individually or in bulk, and details the process of adding new administrators. By following these steps, you can efficiently manage user access and permissions within the Ronspot system.