Table of contents
1. Disambiguation
Ronspot offers two different ways to automatically cancel bookings that have not been confirmed by employees:
-
Mandatory confirmation in booking reminder – Users receive a booking reminder via email and/or notification and must confirm their booking before a set deadline. If they fail to do so, their booking is automatically cancelled.
-
Mandatory check-in – Users must check in for their booking within the required timeframe. If they do not check in, their booking is automatically cancelled, freeing up the space for others.
This guide will walk you through the process of setting up each method, helping you ensure that unused spaces are made available to other employees efficiently.
2. Booking reminders with auto-cancellation
Step 1: Navigate to 'Zones and maps'
- Log in to the Ronspot admin panel.
- Navigate to
Spaces > Zones and Maps.
Step 2: Select and edit the zone
- Choose the zone you want to configure.
- Click on the zone name or the pencil button to enter the zone settings.
Step 3: Go to the 'Reminders' tab
- In the zone settings, click on the
Reminderstab.
Step 4: Enable the reminders
-
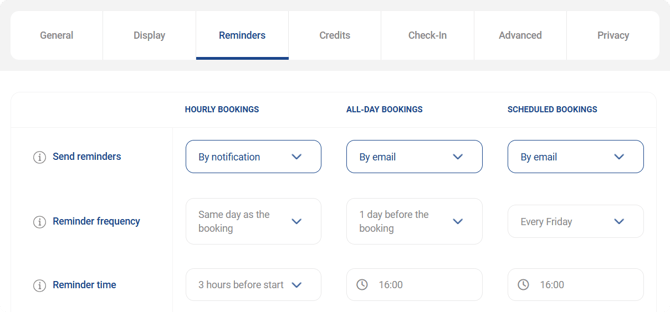
Send reminders: Choose how reminders should be sent:
By email,By notificationorBy email and notification
For more detailed instructions on configuring booking reminders, please read this article.
Step 5: Configure the following fields:

- Confirmation required in reminder
Yes: Activating this option will add a clickableYes - RequiredandNo - Releasebuttons to the booking reminders sent to users. If a user does not confirm their booking, it will be automatically canceled.No: No confirmation will be required, and bookings will not be automatically canceled.
- Confirmation required within:
- Define the timeframe within which users must confirm their booking after the reminder is sent. Unconfirmed bookings will be automatically released after this period.
Step 6: Save your changes
- Click on the
Updatebutton to save your changes.
3. Check-in with auto-cancellation
Step 1: Navigate to Zones/Maps
- Log in to the Ronspot admin panel.
- Navigate to
Spaces > Zones and maps.
Step 2: Select and edit the zone
- Choose the zone you want to configure by clicking on it.
- Click on the zone name or pencil icon to enter the zone settings.
Step 3: Go to the 'Check-In' tab
- In the zone settings, click on the
Check-intab.
Step 4: Enable the check-in system
- Choose the
Check-in typethat best fits your needs

For more detailed instructions on configuring the check-in system, please read this article
Step 4: Configure the following fields

- Auto-release
Yes:If enabled, employees who fail to check in within the specified timeframe will have their booking automatically canceled.No: If disabled, the booking will remain even if the employee does not check in.
- Auto-release after
- Define the timeframe within which users must check in after the reminder is sent. Unchecked bookings will be automatically released after this period.
-
Click on the
Updatebutton to save your changes.